I remember the rain pattering gently against the window of Grandma’s kitchen while she pulled a faded, flour-dusted index card from her old tin. She called these “fly cemeteries” with a playful wink, a name that always made us grandkids giggle before we devoured the crisp, fruit-filled layers. It is a recipe that feels like a quiet Sunday afternoon, filled with the scent of warming currants and the comfort of heritage baking that has survived through the decades.

These Garibaldi Biscuits are a true British treasure, known for their remarkably thin, crisp texture and the way the sweet fruit peeks through the golden, paper-thin crust. They are not overly sweet like modern treats, which makes them the perfect companion for a hot cup of tea or a cold glass of milk shared around the kitchen table. Making them is a labor of love that rewards you with a snap and a chew that no store-bought version can ever match.
A Timeless Jar Favorite
There is something deeply satisfying about a biscuit that relies on the honest flavors of fruit and flour rather than piles of frosting. You will love this recipe because it brings a sense of history into your home, connecting your kitchen to the generations of bakers who knew that the simplest treats are often the most cherished. These biscuits are sturdy enough to live in a cookie jar for a week, yet they possess a delicate crunch that feels special every time you take a bite.
In our family, we treasure these because they represent the art of patience. Unlike a quick drop cookie, these require a gentle hand when rolling and a bit of care when preparing the fruit. That extra effort results in a biscuit that is sophisticated, nostalgic, and perfectly balanced. Whether you call them Garibaldi biscuits or by their whimsical nicknames, they are a testament to the beauty of traditional baking techniques that never go out of style.
Print
Garibaldi Biscuits
- Total Time: 48 mins
- Yield: 12 biscuits
Description
These classic British Garibaldi biscuits feature a thin, crisp dough packed with a layer of zesty, orange-infused currants. Perfectly golden and slightly chewy, they are the ideal traditional treat to enjoy alongside a warm cup of tea or a cold glass of milk.
Ingredients
- 1 cup dried currants or raisins (or finely chopped dried cherries)
- 1/4 cup orange juice
- 1 1/2 cups self-raising flour
- 1 pinch salt
- 4 tbsp cold butter, cubed
- 1/4 cup granulated sugar, plus extra for sprinkling
- 1 large egg, separated
- 1 tbsp water
Instructions
- Finely chop the dried fruit and simmer with orange juice in a small saucepan until liquid is absorbed; strain and pat dry thoroughly with paper towels.
- Pulse flour, salt, and cold butter in a food processor until the mixture resembles fine breadcrumbs, then stir in the sugar.
- Add the egg yolk and water, pulsing until the dough just begins to clump together, then briefly knead on a floured surface into a smooth ball.
- Divide the dough into two disks, wrap them, and refrigerate for 20 minutes to allow the butter to firm up.
- Preheat oven to 350°F (175°C) and roll each disk into a 6×8 inch rectangle on a floured surface.
- Brush one rectangle with reserved egg white, spread the fruit over it leaving a small border, and place the second rectangle on top.
- Gently roll the combined layers into a single 10×11 inch rectangle until the fruit starts to show through the dough.
- Cut into 12 even pieces, brush the tops with remaining egg white and a sprinkle of sugar, then bake for 12-13 minutes until light golden brown.
- Cool on the baking sheet for five minutes before transferring to a wire rack to crisp up completely.
Notes
To ensure the biscuits stay perfectly crisp, make sure to dry the fruit thoroughly after simmering; excess moisture can lead to a soft texture. If you find the dough becoming too warm while rolling, simply return it to the refrigerator for a few minutes to firm up the butter for a cleaner cut.
- Prep Time: 35 mins
- Cook Time: 13 mins
- Category: Dessert
- Method: Baking
- Cuisine: British
Pantry Staples for a Classic Snap
To recreate this heritage treat, you will need simple, high-quality ingredients that most of us keep tucked away in our cupboards. The magic lies in how we treat these basics to achieve that signature thinness and concentrated fruit flavor.
- Dried Fruit: I prefer a mix of currants and raisins, but using dried cherries adds a wonderful tartness that Grandma would have loved. The key is chopping them finely so they can be pressed thin between the dough layers.
- Orange Juice: This is used to gently plump the fruit, infusing it with a bright citrus note that cuts through the richness of the butter.
- Self-Raising Flour: This provides just enough lift to keep the biscuits from being hard, ensuring they remain crisp and light.
- Cold Butter: Using cold butter is essential for creating those tiny pockets of air that result in a flaky, biscuit-like texture.
- Egg Separated: The yolk goes into the dough for richness, while the white is used as a wash to give the tops a beautiful, golden sheen.
- Granulated Sugar: Just a touch in the dough and a sprinkle on top for that classic crunch.
The Heritage Method
Step 1: Prepare the Fruit Filling
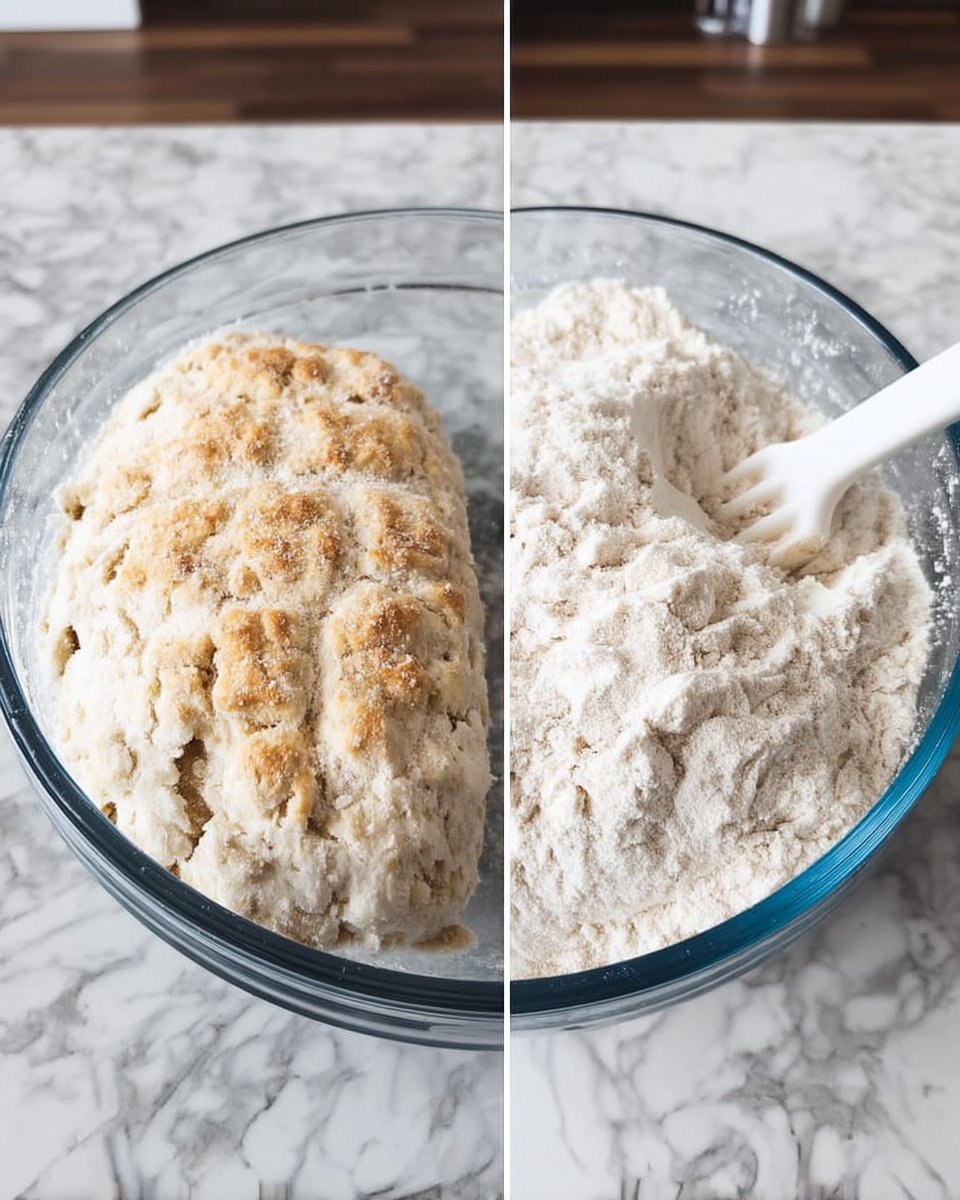
Begin by finely chopping your choice of dried fruit. In a small saucepan, gently warm the fruit with the orange juice until it reaches a simmer. Remove it from the heat and let the fruit soak up the liquid for a few minutes. Strain the fruit thoroughly and place it on paper towels, patting it dry to remove as much moisture as possible. This prevents the dough from becoming soggy.
Step 2: Create the Buttery Crumbs
Place your self-raising flour and a pinch of salt into a food processor. Add the cold, cubed butter and pulse the mixture until it resembles fine breadcrumbs. This process ensures the fat is evenly distributed, which is the secret to a perfectly crisp biscuit. Sprinkle in the sugar and pulse once more to combine.
Step 3: Bind the Dough
Add the egg yolk and a tablespoon of water to the flour mixture. Pulse just until the dough begins to clump together. Turn the dough out onto a lightly floured surface and knead it very gently for just a few seconds. You want a smooth ball that is easy to handle but not overworked, as too much warmth from your hands will melt the butter.
Step 4: Chill for Success
Divide the dough into two equal portions and flatten them into disks. Wrap them tightly in parchment or plastic and let them rest in the refrigerator for about 20 minutes. This resting period allows the gluten to relax and the butter to firm up again, making the rolling process much easier.
Step 5: Roll and Layer
Preheat your oven to 350°F (175°C). On a floured surface, roll each disk of dough into a thin rectangle, roughly 6×8 inches. Brush one rectangle with some of the reserved egg white. Evenly sprinkle your prepared dried fruit over the egg white, leaving a tiny border at the edges. Place the second rectangle of dough directly on top of the fruit.
Step 6: The Final Roll
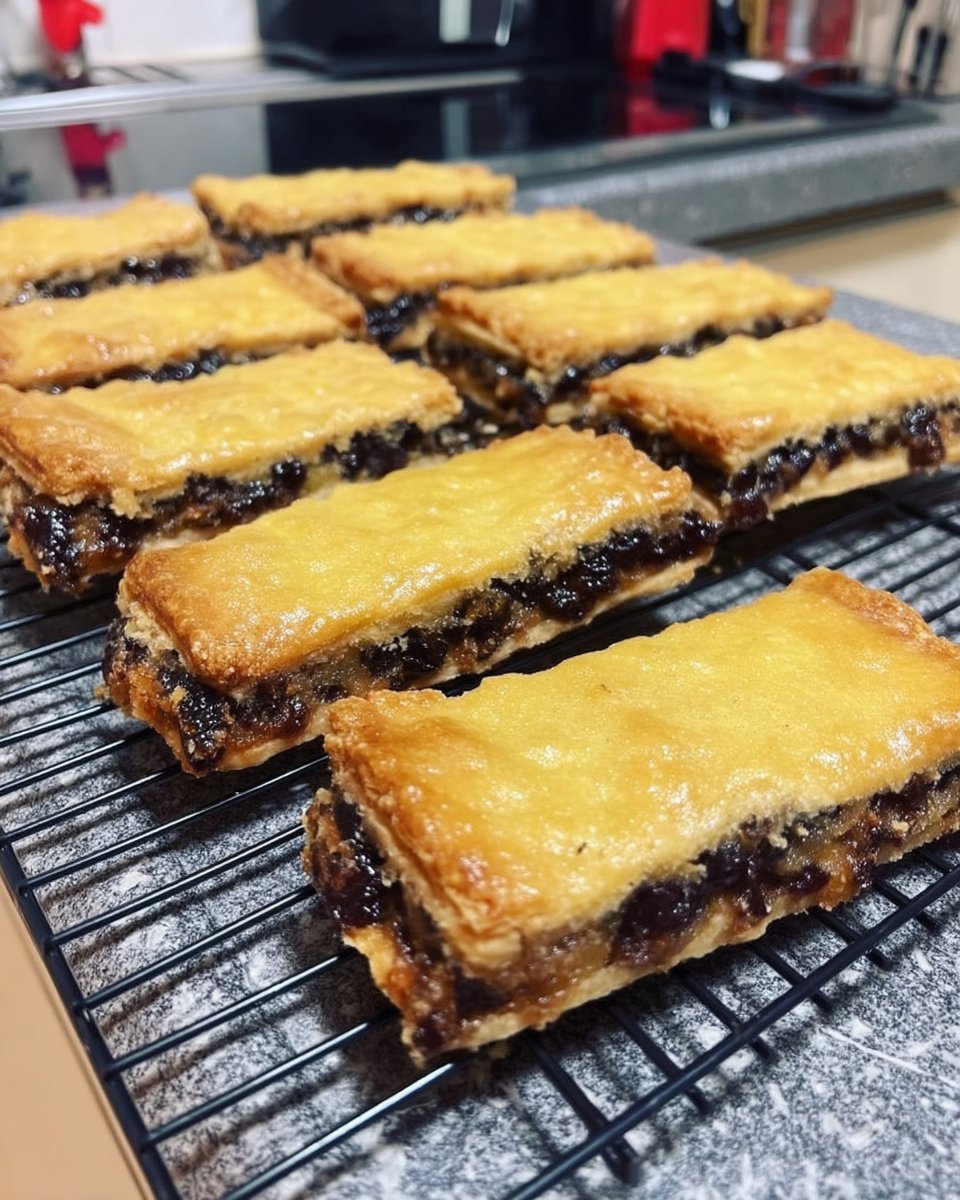
This is the most important part of the heritage method. Using your rolling pin, gently but firmly roll the two layers together until you have a single large rectangle, about 10×11 inches. You will see the fruit start to show through the dough—this is exactly what we want! It creates that “squashed fly” appearance that is so iconic.
Step 7: Cut and Bake
Using a sharp knife or a pastry wheel, cut the rectangle in half lengthwise and then into six even pieces. Place them on a baking sheet lined with parchment. Brush the tops with the remaining egg white and a tiny sprinkle of sugar. Bake for 12 to 13 minutes until they are a beautiful, light golden brown. Let them cool on the sheet for five minutes before moving them to a wire rack. If the fruit makes them stick together, a pair of kitchen scissors can help you separate them cleanly.
Grandma’s Secrets for the Perfect Snap
One of the most important things to remember is that moisture is the enemy of a crisp Garibaldi. When you are straining your fruit after simmering it in juice, be aggressive with the paper towels. You want the fruit to be plump with flavor but dry on the outside so it doesn’t steam the dough from the inside out. For more ideas on keeping your treats traditional, look through our Classic Cookie Recipes for inspiration.
Another secret from the old index cards is the “double roll.” Don’t be afraid to roll the dough thin. These aren’t meant to be thick, cakey cookies. They should be thin enough that you can almost see the fruit through the top layer. If the dough gets too soft while you are working with it, don’t hesitate to pop it back in the fridge for five minutes. Cold dough is much easier to manage when you are aiming for that professional, heritage look. This recipe is also featured at Little House Big Alaska where you can see more traditional British baking tips.
Family Heritage Twists
While the classic version uses currants, our family has enjoyed many variations over the years. My favorite is using dried cherries and a bit of lemon zest in the dough for a bright, modern feel that still honors the original spirit of the recipe. If you prefer something heartier, you can find similar textures in our Wholesome Cookie Options section.
For a festive holiday version, try adding a pinch of cinnamon or nutmeg to the flour. You can also experiment with the glaze; instead of a simple egg white, a tiny brush of milk and a dusting of coarse sanding sugar can give the biscuits a sparkly, celebratory appearance. Some folks in the northern counties even used to add a tiny bit of lard alongside the butter for an even flakier finish, though all-butter remains my personal preference for that nostalgic taste of home.
Sharing the Tradition
In my house, the cookie jar is never empty, and these Garibaldi biscuits are a mainstay. They are best served with a strong cup of black tea or a creamy Earl Grey. The crispness of the biscuit holds up well to a quick dip in the tea, just like Grandma used to do when she thought no one was looking. If you need a faster treat for unexpected guests, check out our Quick & Easy Cookies for more ideas.
When serving these at a family gathering, I love to arrange them on a vintage glass platter. Their rectangular shape and the dark fruit peeking through make for a very elegant presentation. They also pack beautifully for picnics or as a thoughtful gift tucked into a tin with a piece of parchment paper between the layers. Sharing these biscuits is like sharing a piece of history, and it always sparks wonderful stories about the “old days” in the kitchen.
The Sweet Heritage of Home
Baking these Garibaldi biscuits is a way to slow down and appreciate the traditions that connect us to our past. Every time I smell that orange-infused fruit warming on the stove, I am transported back to Grandma’s kitchen, where the world felt safe and every problem could be solved with a biscuit and a chat. I hope this recipe finds a permanent home in your recipe box and brings as much joy to your family as it has to mine. For more ways to celebrate the seasons through baking, visit our Holiday Cookie Celebrations page.
I would love to see your heritage bakes and hear your family stories! Please share your photos and memories with us on Pinterest, Instagram, and Facebook. Let us keep the tradition of the cookie jar alive together, one batch at a time. Happy baking, from my kitchen to yours.
