I remember the first time I tasted a Benne Wafer from a dusty old tin, and while the flavor was there, the texture had turned brittle and sad. My mission was to bring back that 1950s charm while making sure these thin treasures stayed fresh and snappy for more than a few hours. This recipe honors those Lowcountry roots while using a few modern tricks to keep that honey-gold center perfectly tender.

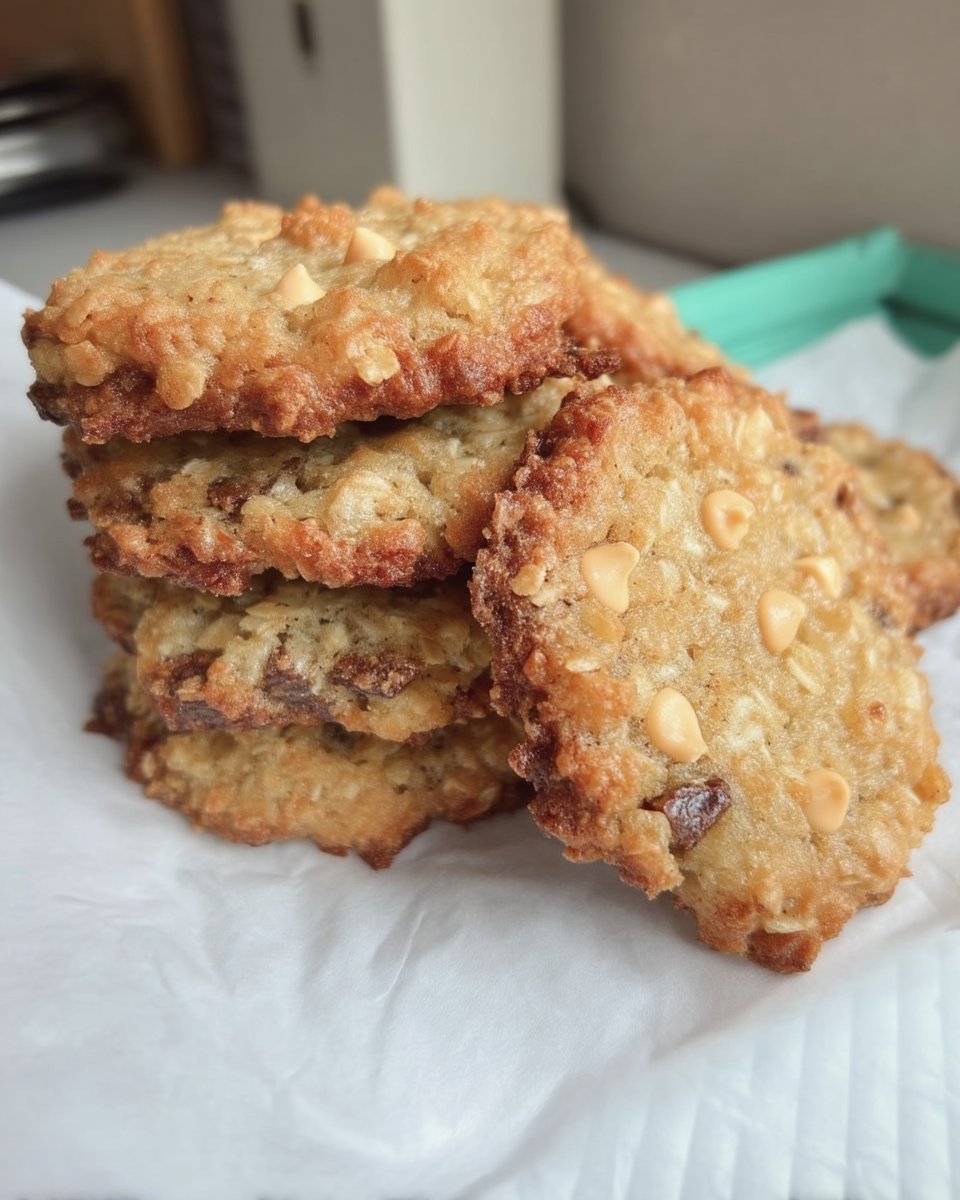
These cookies are a beautiful balance of toasted nuttiness and deep brown sugar sweetness. They are incredibly thin, yet they carry a satisfying chew that makes them stand out from your average butter cookie. By carefully toasting the seeds first, we lock in a layer of flavor that stays vibrant in your cookie jar for days.
A Perfect Heirloom Treat
You will love these because they solve the problem of the boring, dry cracker. Most people expect a wafer to be one-dimensional, but these are a texture revelation. They offer a distinct snap at the edge that gives way to a slightly soft, butter-rich center. It is a vintage experience that feels completely right in a modern kitchen.
These cookies are also incredibly easy to make in large batches. Since the recipe yields about six dozen, you can fill your jars and still have plenty to share with neighbors. They carry a deep sense of history, as benne seeds have been a symbol of good luck for centuries. Every bite feels like a small wish for prosperity, wrapped in a blanket of toasted sesame and caramel notes.
The magic lies in the simplicity of the ingredients. There are no fancy flours or complicated techniques here. Instead, we rely on the chemical reaction between melted butter and brown sugar to create that lace-like structure. It is a reliable, proven recipe that has stood the test of time for a reason. You are not just baking a snack; you are preserving a piece of culinary heritage that stays fresh and delicious long after the oven cools.
Print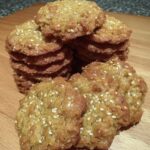
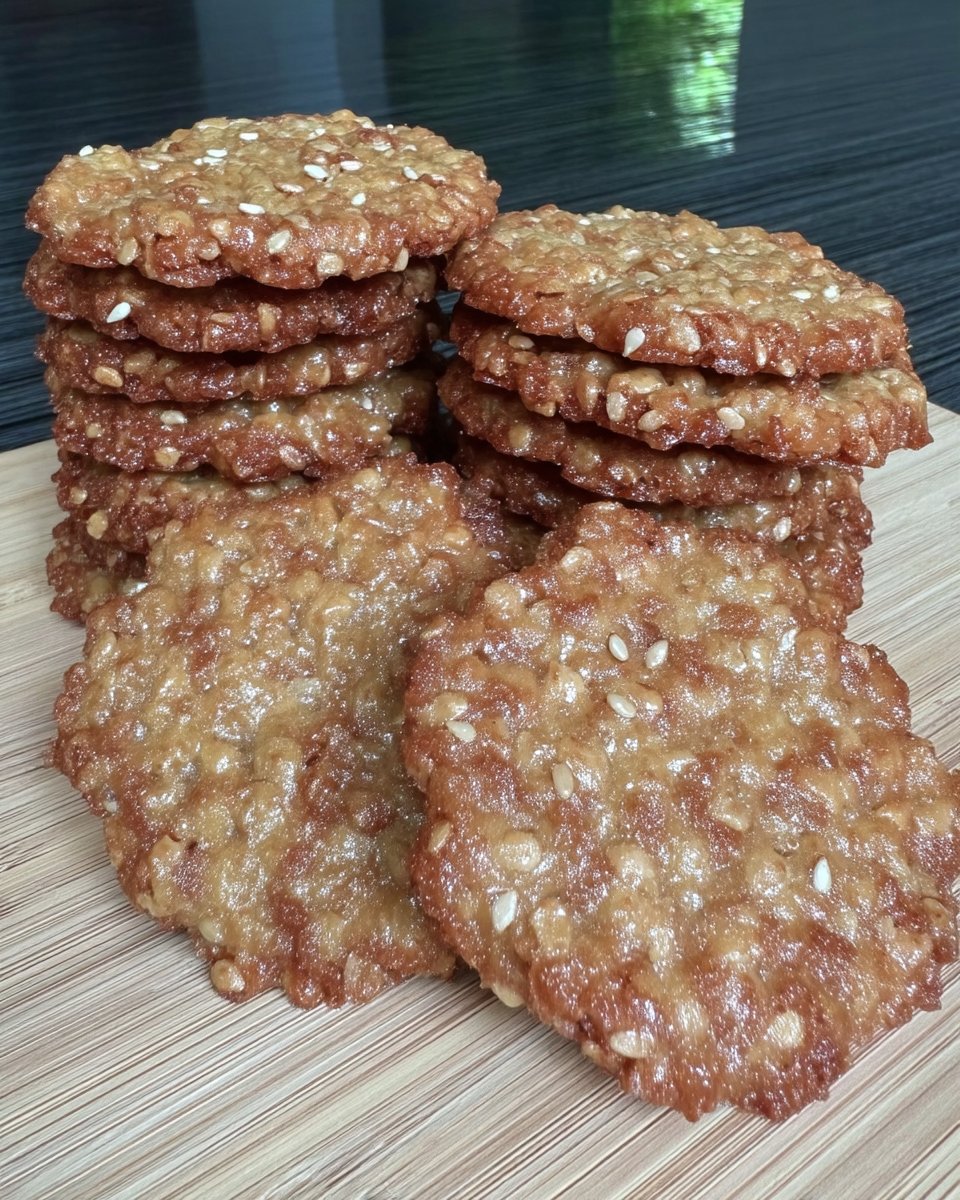
Benne Wafers
- Total Time: 45 mins
- Yield: 72 cookies
- Diet: Vegetarian
Description
Discover the heirloom charm of these delicate sesame seed cookies, known for their toasted nuttiness and distinctive lace-like structure. These thin wafers offer a perfect balance of crispy edges and a slightly chewy, caramel-flavored center that stays fresh for days.
Ingredients
- 1 cup fresh sesame seeds
- 1 1/2 cups dark brown sugar, firmly packed
- 1/2 cup unsalted butter, melted
- 1 large egg
- 1 teaspoon vanilla extract
- 1 cup all-purpose flour
- 1/2 teaspoon salt
- 1/4 teaspoon baking powder
Instructions
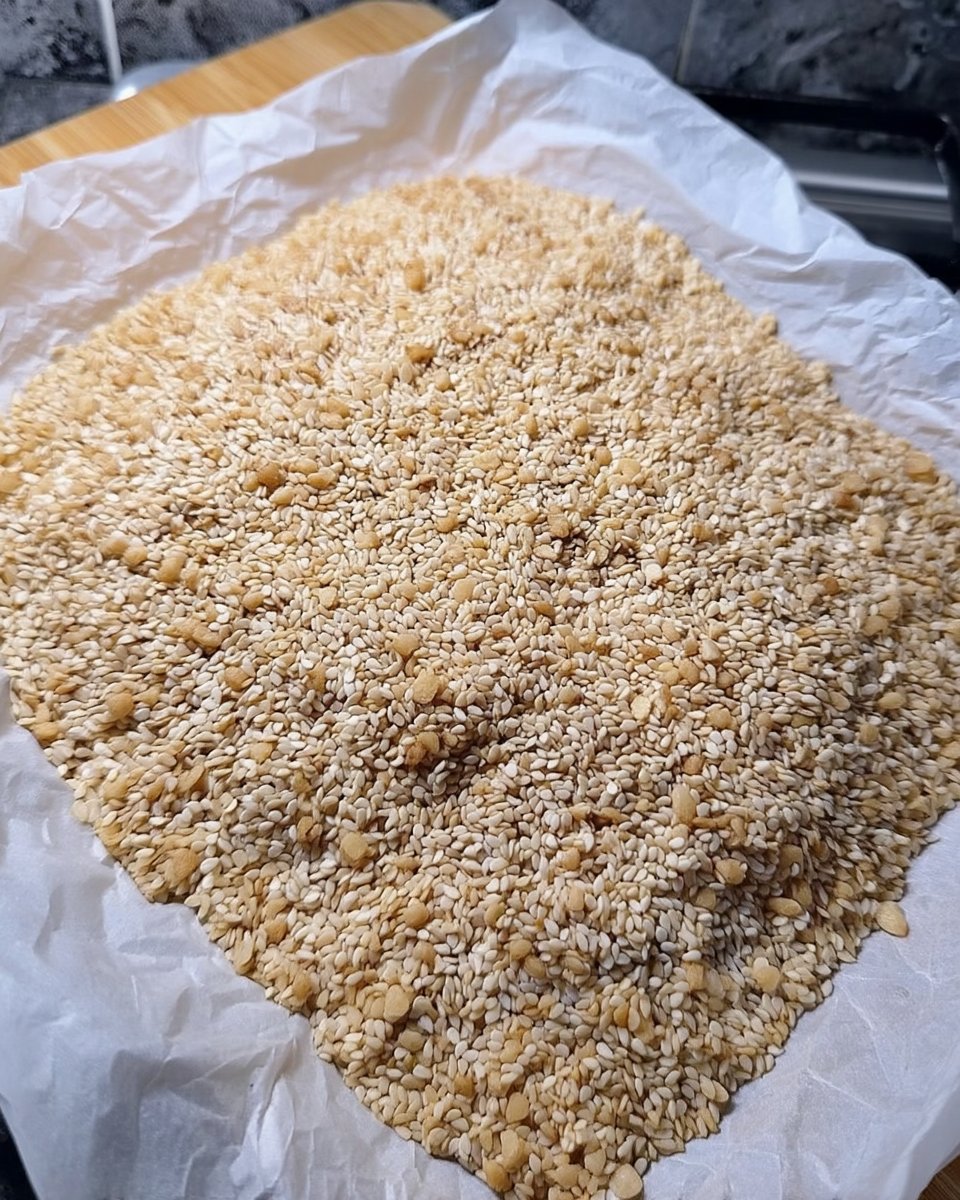
- Preheat oven to 375°F (190°C) and toast sesame seeds on an ungreased baking sheet for 10 to 12 minutes until light brown and fragrant.
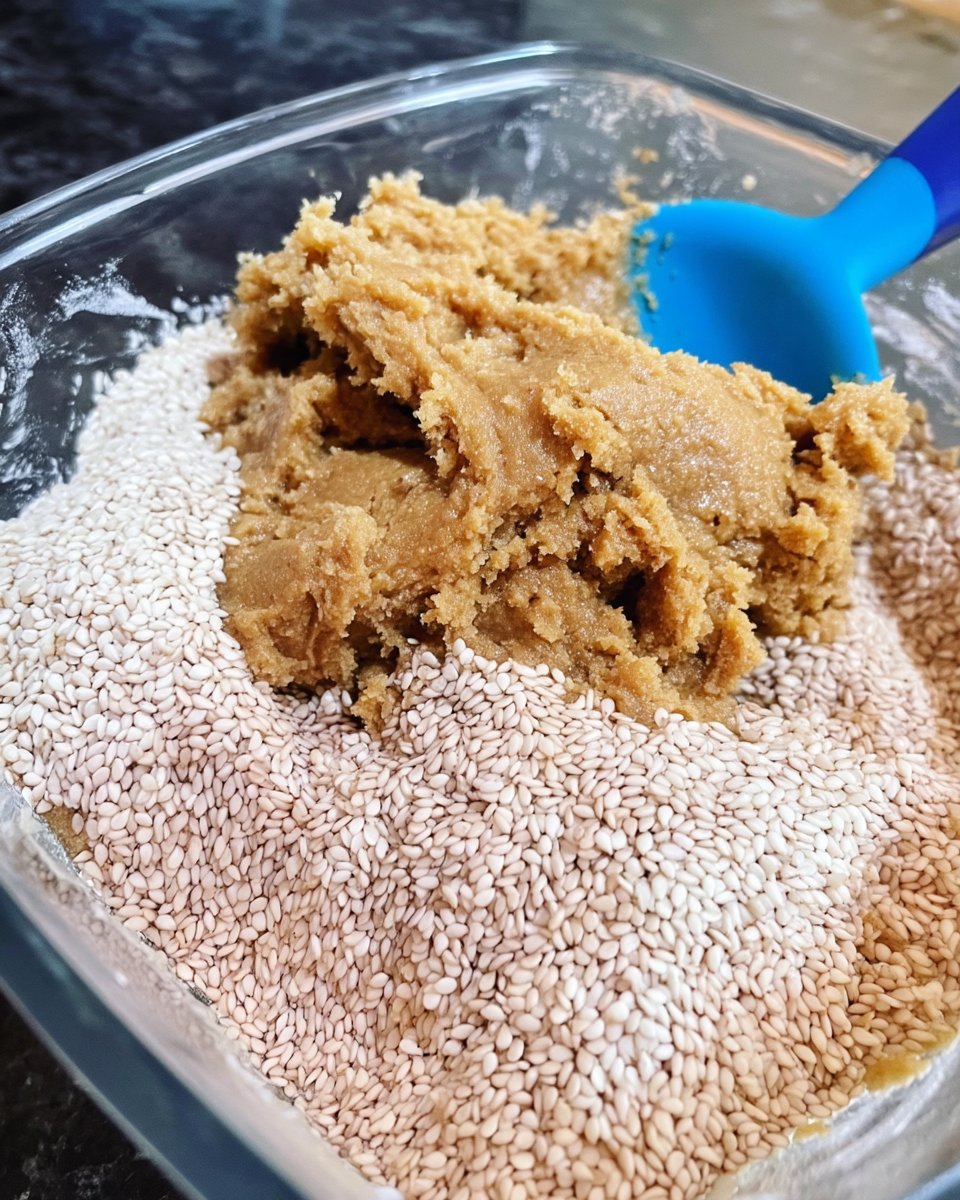
- In a large bowl, stir together the packed dark brown sugar and melted butter until the mixture resembles wet sand.
- Whisk in the egg and vanilla extract until the batter is completely smooth.
- Sift the flour, salt, and baking powder together, then gently fold them into the butter mixture.
- Stir in the cooled, toasted sesame seeds until evenly distributed throughout the thin dough.
- Drop the batter by 1/2 teaspoonfuls onto lightly greased or silicone-lined baking sheets, spacing them at least 1 1/2 inches apart.
- Bake for 4 to 6 minutes until the edges are a dark honey color and the centers are slightly pale.
- Let the wafers rest on the baking sheet for one minute to set, then move to a wire rack to cool completely.
Notes
For the best results, ensure your sesame seeds are fresh to avoid any bitterness, and always allow the baking sheets to cool completely between batches to prevent the cookies from spreading too quickly. If the cookies become soft over time, a quick two-minute toast in a warm oven will restore their original snap.
- Prep Time: 20 mins
- Cook Time: 25 mins
- Category: Dessert
- Method: Baking
- Cuisine: Southern American
The Secret to Toasted Texture
To get that perfect jar-fresh texture, we have to look closely at our building blocks. The star is the sesame seed, but the supporting cast of butter and sugar does the heavy lifting for the chew.
- Sesame Seeds (Benne): We use a full cup of these to provide a dense, nutty crunch. Toasting them is not optional; it is what provides that deep, smoky aroma that defines a true wafer.
- Brown Sugar: This is our moisture hero. I prefer a packed 1 1/2 cups of dark brown sugar because the molasses content keeps the cookies from becoming rock-hard. It provides that essential bend in the middle.
- Melted Butter: Using melted butter instead of softened butter helps the cookies spread thin. This creates those sought-after crisp edges while maintaining a rich, fatty mouthfeel.
- All-Purpose Flour: We only use a small amount to bind the seeds and sugar. This keeps the cookie light rather than cakey.
- Egg and Baking Powder: These provide just enough lift so the wafers do not become teeth-shatteringly hard. The egg adds a touch of protein for a better crumb.
I always recommend using fresh seeds. If your sesame seeds have been sitting in the pantry for a year, they might have a bitter edge. Start with fresh ingredients to guarantee that sweet, toasted profile that everyone loves.
How to Make It
Step 1: Toast Your Seeds
Preheat your oven to 375 degrees F (190 degrees C). Spread your sesame seeds in a single layer on an ungreased baking sheet. Slide them into the oven for 10 to 12 minutes. You must watch them closely during the final minutes; they go from gold to burnt very quickly. Once they smell like toasted nuts and look light brown, pull them out to cool.
Step 2: Create the Base
In a large mixing bowl, combine your packed brown sugar and melted butter. Stir them together until the mixture looks like wet sand. Add in your egg and vanilla extract, whisking until the batter is smooth. This step is where we build the moisture that keeps the cookies soft in the center.
Step 3: Mix the Dry Ingredients
Sift together your flour, salt, and baking powder. Fold these into the butter mixture gently. Finally, stir in those beautiful toasted sesame seeds. The dough will be thinner than a standard chocolate chip cookie dough, which is exactly what we want for a wafer-style treat.
Step 4: Drop and Bake
Lightly grease your baking sheets or use a silicone mat. Drop the dough by 1/2 teaspoonfuls. Do not be tempted to make them larger, or they will merge into one giant sheet. Space them at least 1 1/2 inches apart. Bake for 4 to 6 minutes. You are looking for the edges to turn a dark honey color while the center remains slightly pale.
Step 5: The Cooling Process
Let the cookies sit on the baking sheet for about one minute after you take them out. This allows them to set so they do not tear. Move them carefully to a wire rack. As they cool completely, they will develop that signature snap while the brown sugar keeps the very heart of the cookie tender.
Mehmet’s Freshness Secrets
One of my favorite tricks for keeping these wafers soft for days is to underbake them just a hair. If you wait until the entire cookie is brown, they will be very crispy. By pulling them when the center is still a bit soft, you lock in a chewy texture that lasts. For more ideas on maintaining perfect bakes, check out our Classic Cookie Recipes.
Always use a heavy-duty baking sheet to prevent the bottoms from scorching. If you find your cookies are sticking, a bit of parchment paper is a lifesaver. You can also refer to this classic technique if you want to see how the traditional proportions have evolved over the years. Store them with a small piece of bread in the jar if you live in a very dry climate; the cookies will pull the moisture from the bread and stay tender.
Heritage Texture Tweaks
If you want a more complex flavor, try replacing a tablespoon of the brown sugar with honey or molasses. This will make the cookies even chewier and give them a darker, glossier finish. For those looking for different dietary paths, you can find inspiration in our Wholesome Cookie Options section.
You can also add a pinch of cayenne pepper if you enjoy a
Serving Your Jar-Fresh Wafers
These wafers are the ultimate companion for a warm cup of tea or a sharp espresso. The nuttiness of the sesame seeds complements the roasted notes of coffee beautifully. If you are looking for other treats that pair well with afternoon drinks, browse our Quick & Easy Cookies for more inspiration.
I love serving these on a vintage silver tray for a touch of 1950s elegance. They are also wonderful when crumbled over vanilla bean ice cream, adding a salty crunch to a creamy dessert. Because they are so thin, they make excellent ice cream sandwiches if you put a tiny scoop of lemon sorbet between two wafers.
The Texture Truth
Baking Benne Wafers is a way to connect with the past while enjoying a treat that truly stays fresh. By focusing on the moisture of the brown sugar and the crunch of the toasted seeds, you create a cookie that will never be forgotten in the back of the pantry. For more ways to celebrate heritage in your kitchen, visit our Holiday Cookie Celebrations page.
I hope these become a new tradition in your home. If you make a batch, please share your photos with our community! You can find us on Pinterest, Instagram, and Facebook. Happy baking, and may your cookie jar always be full of something soft and fresh.
