I still remember the scent of toasted pecans and rich cocoa that filled Grandma’s kitchen every rainy afternoon. She would carefully retrieve her flour-dusted recipe box and pull out a card with edges softened by years of love. This recipe for Chocolate Turtle Cookies wasn’t just a treat; it was a small piece of our family history shared one bite at a time. The way she would press the caramel into the center with a gentle thumbprint is a memory I treasure every time I preheat my own oven today.

These cookies are the very definition of a cute cookie aesthetic 2 because they combine a beautiful, crinkled chocolate exterior with a hidden heart of molten caramel. They are simple to prepare but offer a timeless appeal that makes them look right at home in any glass cookie jar. Whether you are baking for a neighborhood gathering or just looking to fill your home with warmth, these treats carry the honest, comforting spirit of heritage baking.
A Timeless Classic for Your Cookie Jar
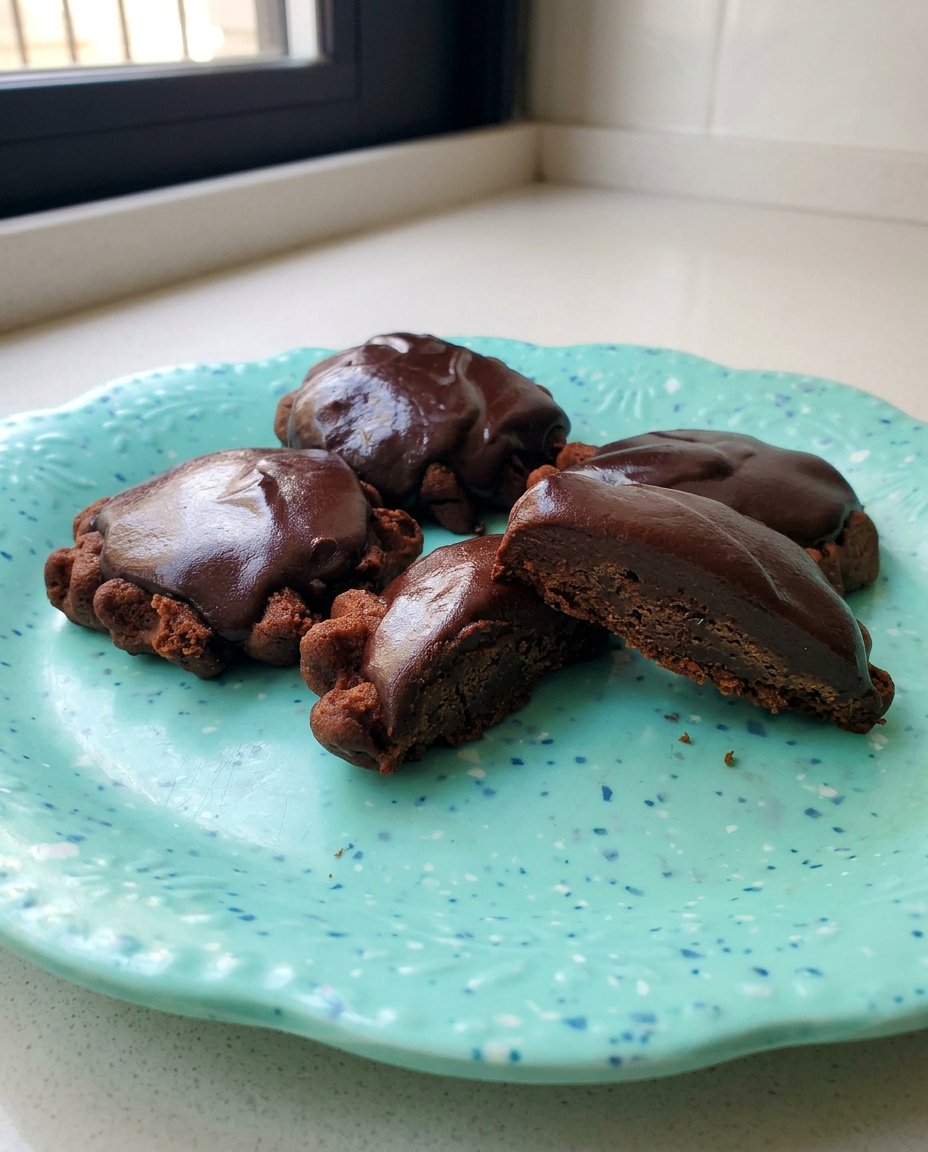
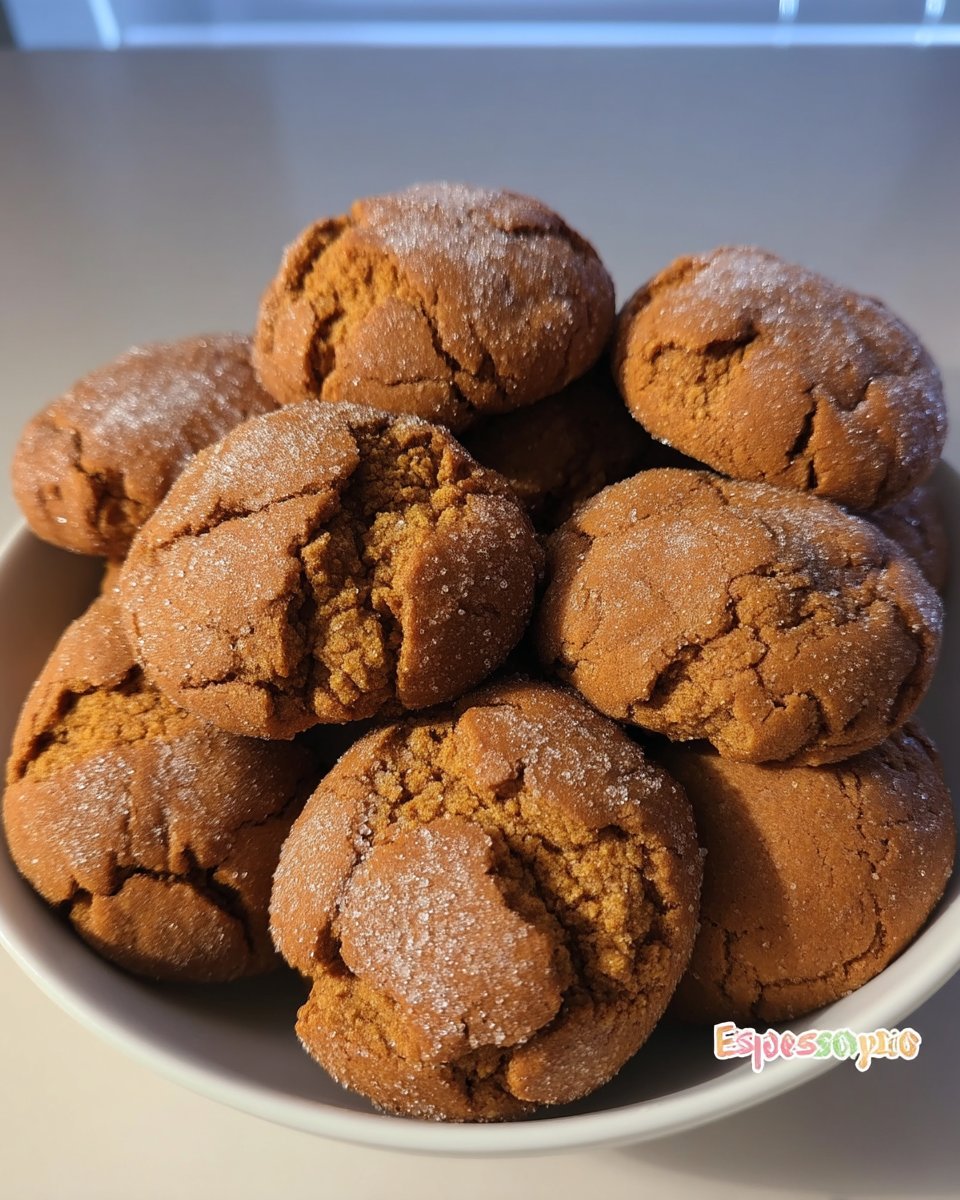
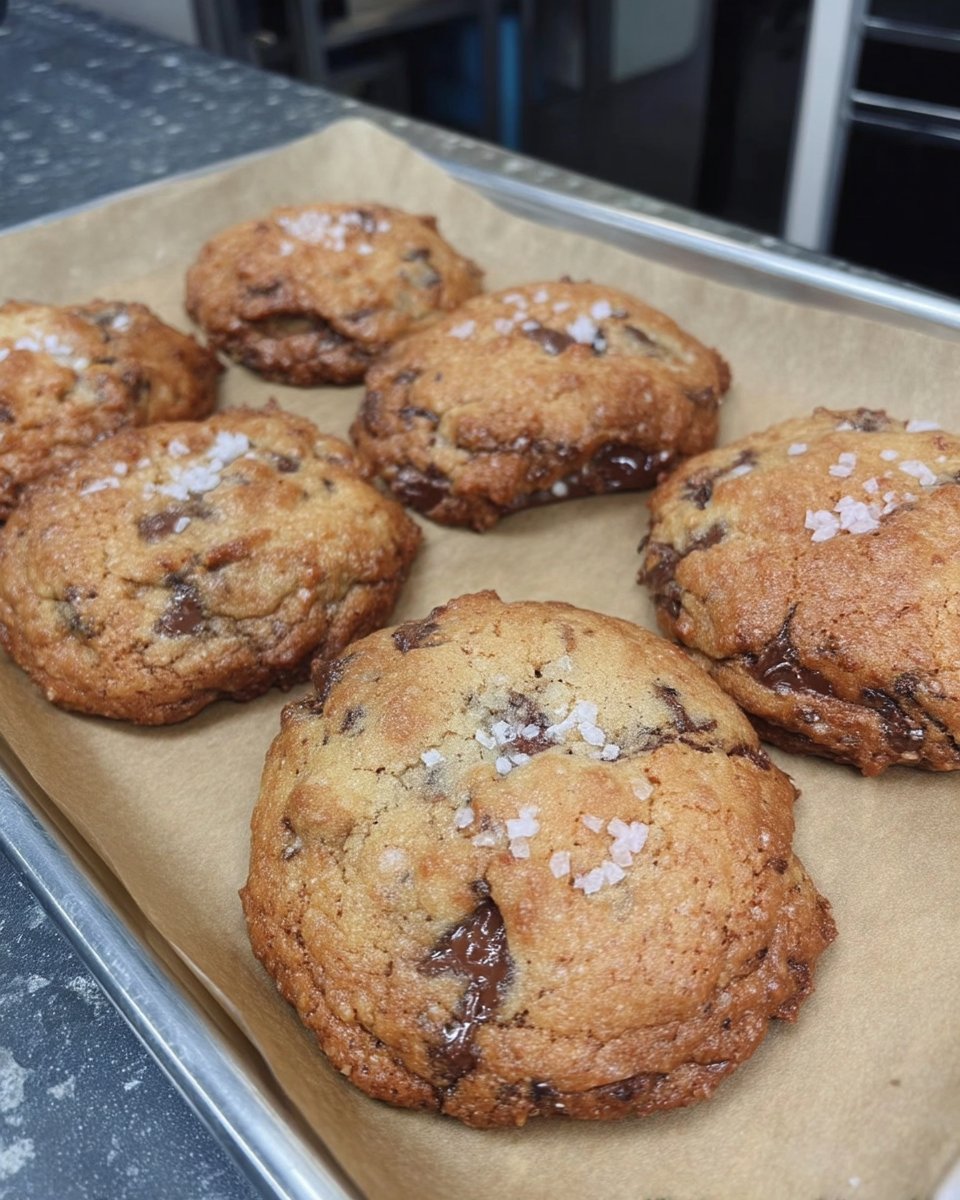
There is something truly magical about a cookie that hides a secret, and these Chocolate Turtle Cookies are a beloved treasure in our home. When you first look at them, you see a rich, dark chocolate surface studded with crunchy pecans, perfectly capturing that cute cookie aesthetic 2 that everyone seems to adore these days. But the real joy comes when you take that first bite and discover the soft, buttery caramel hidden inside. It is a contrast of textures and flavors that feels like a warm hug from the past.
We love this recipe because it relies on the simple pantry staples that Grandma always kept on hand—real butter, pure vanilla, and honest cocoa. There are no fancy tricks or complicated gadgets required here, just a bit of patience and a lot of heart. These cookies stay fresh and soft for days, making them the perfect candidate for a countertop cookie jar. They represent the kind of baking that doesn’t try too hard but succeeds because it is rooted in tradition and quality ingredients. Every time I bake a batch, I am reminded that the best things in life are often the ones we share with the people we love around a kitchen table.
Print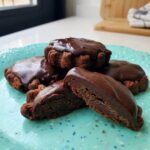
Chocolate Turtle Cookies
- Total Time: 1 hour 33 mins
- Yield: 12 cookies
- Diet: Vegetarian
Description
These decadent chocolate cookies feature a rich, cocoa-infused dough wrapped around a hidden gooey caramel center and studded with crunchy pecans. They are the perfect blend of nostalgic flavor and beautiful texture, making them a standout addition to any dessert table.
Ingredients
- 2 cups all-purpose flour
- 1/2 cup unsweetened cocoa powder
- 1 teaspoon baking soda
- 1/2 teaspoon kosher salt
- 1 cup unsalted butter, softened
- 1/2 cup light brown sugar, packed
- 1/2 cup granulated sugar
- 1 large egg
- 1 teaspoon pure vanilla extract
- 1 cup raw pecans, finely chopped
- 12 soft caramels
Instructions
- In a large bowl, whisk together the all-purpose flour, unsweetened cocoa powder, baking soda, and kosher salt.
- In a separate bowl, cream the softened butter with the brown sugar and granulated sugar using a handheld mixer for 2-3 minutes until pale and fluffy.
- Beat in the large egg and pure vanilla extract until the mixture is smooth and well combined.
- Gradually mix the dry ingredients into the wet mixture on low speed, then fold in the finely chopped pecans with a spatula.
- Cover the dough and refrigerate for at least one hour to allow flavors to meld and dough to firm up.
- Preheat your oven to 350°F (175°C) and line two baking sheets with parchment paper.
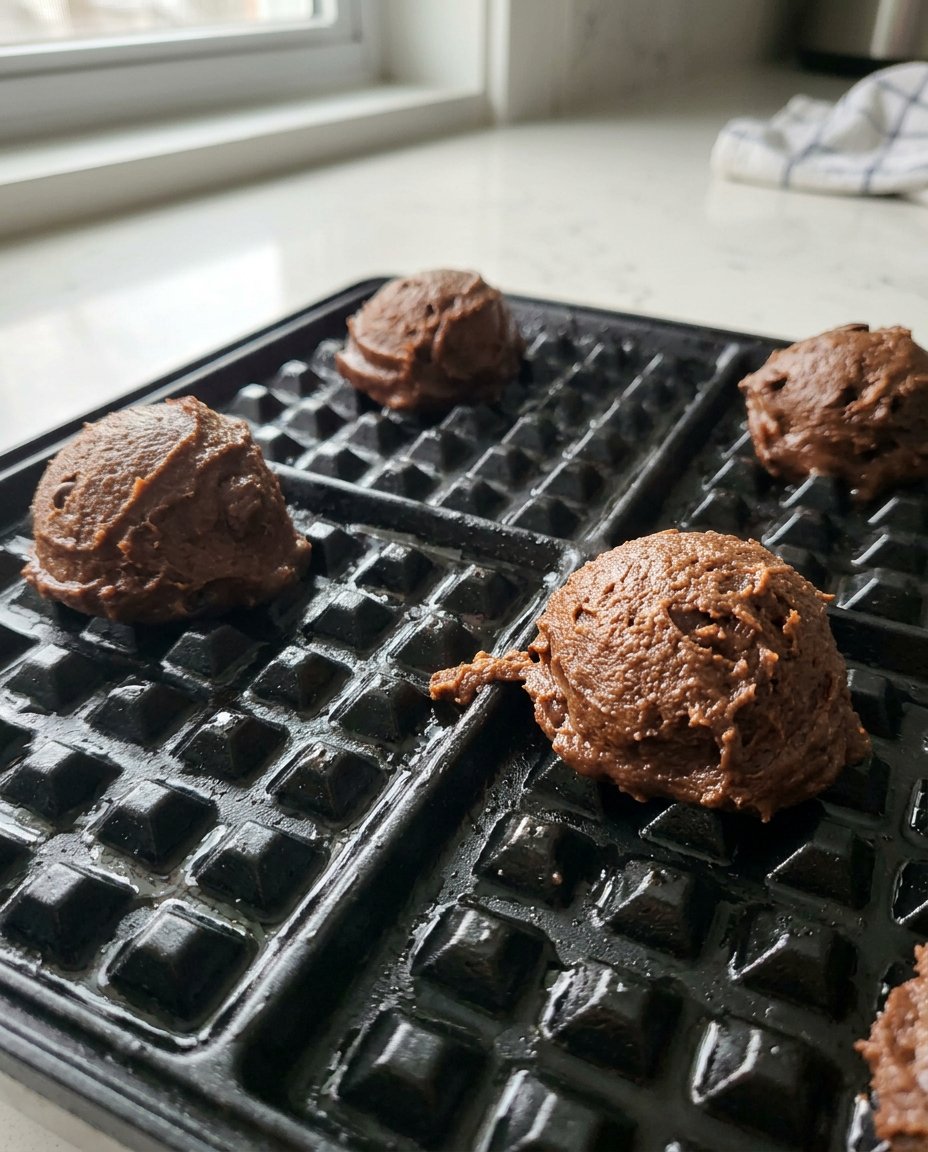
- Scoop the cold dough into 12 even rounds, press a soft caramel into the center of each, and roll the dough back into a smooth ball to seal.
- Place the cookies 3 inches apart on the prepared sheets and bake for 16-18 minutes, rotating the pans halfway through.
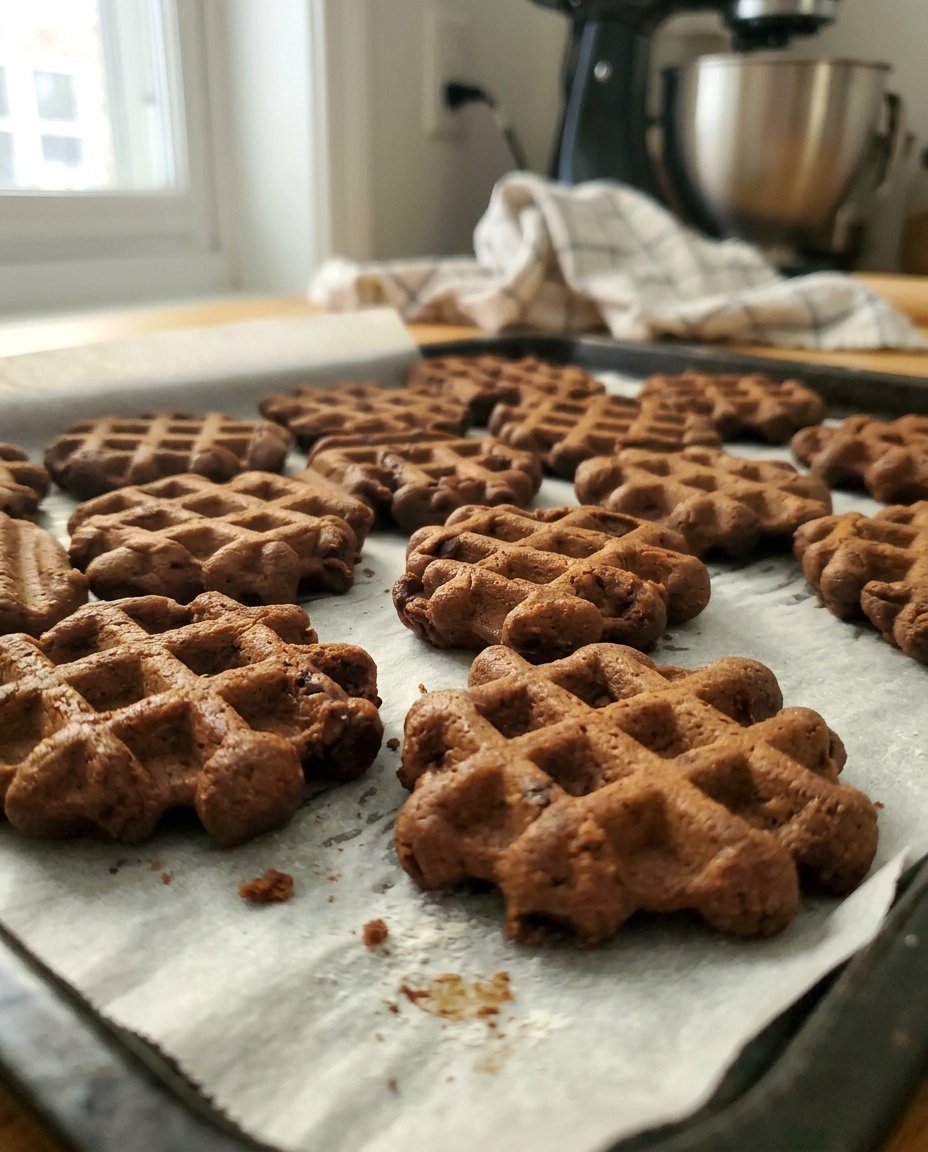
- Allow the cookies to cool on the baking sheets for 10 minutes before transferring them to a wire rack to set completely.
Notes
For the best texture, ensure your butter is truly at room temperature before creaming to incorporate enough air for a soft crumb. If the caramels are particularly large, you may want to cut them in half to ensure they stay completely encased within the dough during baking.
- Prep Time: 15 mins
- Cook Time: 18 mins
- Category: Dessert
- Method: Baking
- Cuisine: American
Simple Ingredients from Grandma’s Pantry
To make these cookies, you will need a few basic items that you likely already have in your cupboards. The beauty of heritage baking lies in how these simple elements come together to create something extraordinary. I always suggest using the best quality butter and vanilla you can find, as their flavors really shine through in the finished cookie.
- All-Purpose Flour: This provides the sturdy yet tender structure that every good drop cookie needs.
- Unsweetened Cocoa Powder: This gives the cookies their deep, dark chocolate color and rich flavor profile.
- Unsalted Butter: Make sure it is softened to room temperature so it creams beautifully with the sugars.
- Brown and Granulated Sugars: Using both creates a perfect balance of sweetness and a soft, chewy texture.
- Large Egg: This acts as the binder, bringing the dough together with a gentle richness.
- Pure Vanilla Extract: A splash of vanilla is like a quiet note of comfort in every bite.
- Raw Pecans: These add a wonderful crunch and a nutty depth that complements the chocolate and caramel.
- Soft Caramels: These are the stars of the show, melting into a gooey center as the cookies bake in the oven.
The Classic Way to Bake Memories
Step 1: Whisk the Dry Ingredients
In a large bowl, whisk together your all-purpose flour, unsweetened cocoa powder, baking soda, and kosher salt. This step is important because it evenly distributes the leavening agent and ensures there are no lumps of cocoa in your final dough. Take a moment to appreciate the deep, earthy scent of the cocoa as it mingles with the flour.
Step 2: Cream the Butter and Sugars
In a separate large bowl, use a handheld mixer on medium-high speed to beat the softened butter with both the light brown sugar and the granulated sugar. You want to keep going for about 2 to 3 minutes until the mixture looks creamy and pale. This process incorporates air into the dough, which helps the cookies achieve their perfect texture.
Step 3: Add the Egg and Vanilla
Add the large egg and the pure vanilla extract to the butter mixture. Beat again until everything is well combined and smooth. I always feel that this is where the dough starts to smell like a real kitchen—warm, sweet, and full of promise.
Step 4: Combine and Fold in Pecans
Turn your mixer to medium-low speed and gradually add the dry ingredients to the wet mixture. Mix only until just a few dry streaks remain; you don’t want to overwork the dough. Finally, use a spatula to gently fold in the finely chopped raw pecans. Cover the bowl with plastic wrap and let it rest in the refrigerator for at least one hour. This chilling time is vital for the flavors to meld and the dough to firm up.
Step 5: Stuff with Caramel and Bake
Preheat your oven to 350°F (175°C) and line two baking sheets with parchment paper. Using a large cookie scoop, divide the cold dough into 12 rounds. Press your finger into the center of each round to create a small well, then place a soft caramel inside. Pinch the dough back over the caramel and roll it into a smooth ball. Arrange them on your sheets, spacing them 3 inches apart. Bake for 16 to 18 minutes, rotating the sheets halfway through, until the edges are set and the tops are puffed. Let them cool on the sheets for 10 minutes before moving them.
Grandma’s Secrets for Perfect Cookies
One of the most important things I learned in Grandma’s kitchen is that patience is an ingredient just like flour or sugar. Chilling your dough is not a step you should skip; it prevents the cookies from spreading too thin and helps keep that caramel center tucked neatly inside. If you find the dough is too hard after a long chill, just let it sit on the counter for ten minutes before you start scooping. For more tips on mastering the basics, take a look at our guide to Quick & Easy Cookies.
When choosing your caramels, look for the soft, chewy variety rather than the hard ones meant for sucking. You want them to yield to the heat of the oven so they become molten. If you find the caramel is leaking out, make sure you are pinching the dough tightly around the candy before rolling it into a ball. This keeps the surprise hidden until the very first bite.
Heritage Twists and Family Favorites
While the combination of chocolate, pecans, and caramel is a timeless favorite, you can certainly make this recipe your own with a few simple changes. If your family isn’t fond of pecans, raw walnuts or even chopped hazelnuts make a wonderful substitute. For those who enjoy a bit of a modern touch on a vintage treat, a small sprinkle of flaky sea salt on top of the cookies just after they come out of the oven can bring out the richness of the chocolate. You can find more creative ideas for your next baking session in our collection of Holiday Cookie Celebrations.
You might also consider using dark chocolate cocoa powder for a more intense flavor, or even adding a handful of mini chocolate chips to the dough along with the pecans. Some of my friends like to use a small piece of a chocolate-covered caramel candy in the center for an extra layer of decadence. No matter how you choose to vary it, the heart of the recipe remains the same—a comforting, homemade treat made with love.
Sharing the Tradition of the Cookie Jar
There is no better way to serve these cookies than slightly warm, perhaps ten or fifteen minutes after they have left the oven. This is when the caramel is at its most gooey and the chocolate is still soft. I love to set them out on a vintage ceramic platter alongside a tall glass of cold milk or a steaming cup of coffee. It’s the kind of snack that encourages people to slow down and stay a while. To learn more about how we present our favorites, visit our page on Cookie Decorating Traditions.
These cookies also make a wonderful addition to a holiday dessert table or a church social. Because they are so rich, they pair beautifully with a simple scoop of vanilla bean ice cream. If you are gifting them, place them in a pretty tin with layers of wax paper between them to keep the surfaces looking perfect. There is something so special about handing a friend a box of homemade cookies that you know will bring a smile to their face.
The Sweet Heritage of Baking with Heart
Baking these Chocolate Turtle Cookies always brings me back to simpler times when the most important thing on the schedule was waiting for the oven timer to ding. It is my hope that this recipe finds a place in your own family’s kitchen and that you find as much joy in the making as you do in the eating. These little moments of sweetness are what build the memories our children and grandchildren will carry with them. For more timeless treasures to fill your home with warmth, be sure to explore our Classic Cookie Recipes.
If you enjoyed this trip down memory lane, I would love for you to share your baking results with our community. You can find more inspiration and share your own kitchen stories with us on Pinterest, Instagram, and Facebook. If you are looking for even more decadent chocolate ideas, you might also enjoy this chocolate turtle recipe. Happy baking, and may your cookie jar always be full!
