I remember the disappointment of reaching into a cookie jar only to find treats that had turned into dry, crumbly rocks. Many vintage recipes lose their moisture far too quickly, but I have spent years perfecting a way to keep that nostalgic flavor while providing a tender, fresh texture. These Oreo Copycat Cookies represent that journey, offering a deep chocolate snap that yields to a creamy center that stays perfect for days.

Creating a homemade version of the world’s most famous sandwich cookie requires more than just sugar and cocoa; it requires a focus on the structural integrity of the dough. By using specific cocoa types and cooling techniques, we can achieve a result that tastes authentic yet feels much more artisanal. You will find that these treats are not just a snack, but a testament to how small texture tweaks can keep a classic recipe alive and fresh in the modern kitchen.
The Ultimate Homemade Crunch\n\nYou will love these cookies because they solve the primary problem with store-bought sandwich cookies: the lack of soul and the artificial aftertaste. This recipe captures the deep, dark cocoa flavor we all crave but adds a layer of quality you can only get from a home kitchen. The texture is designed to be crisp enough to withstand a dunk in milk while remaining tender enough to bite through without the cookie shattering in your hand. This balance of a firm exterior and a soft, buttery filling creates a satisfying contrast that keeps the palate interested. Each bite delivers a nostalgic comfort that reminds us why some traditions are worth keeping, especially when they are improved with modern texture science. These are the cookies that will disappear from the jar faster than any other, primarily because they do not suffer from the staleness that plagues so many other chocolate recipes. By focusing on moisture retention in the cream and a precise bake on the wafers, we have created a cookie that truly stands the test of time.
Print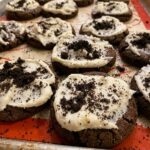
Oreo Copycat Cookies
- Total Time: 30 mins
- Yield: 24 cookies
- Diet: Vegetarian
Description
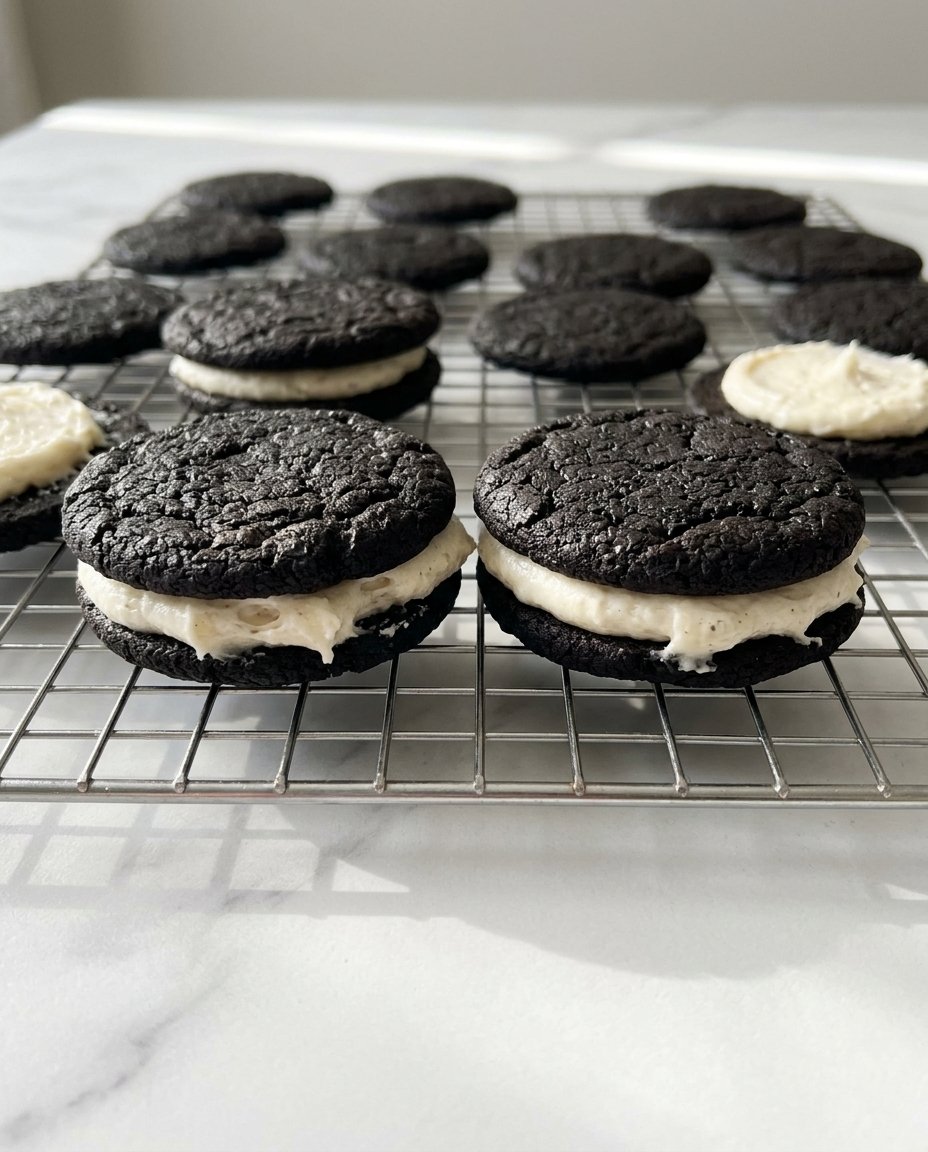
These homemade sandwich cookies feature a signature dark, crunchy cocoa wafer paired with a smooth vanilla cream filling. Perfectly balanced to satisfy nostalgia, they offer a superior texture that stays crisp even when dunked in milk.
Ingredients
- 1 1/4 cups all-purpose flour
- 1/2 cup black cocoa powder
- 1 cup granulated sugar
- 1/4 teaspoon salt
- 1/4 teaspoon baking soda
- 1/4 teaspoon baking powder
- 10 tablespoons unsalted butter, cool room temperature
- 1 large egg
- 1/2 cup unsalted butter, softened
- 2 cups powdered sugar, sifted
- 2 teaspoons vanilla extract
- 1 pinch salt
Instructions
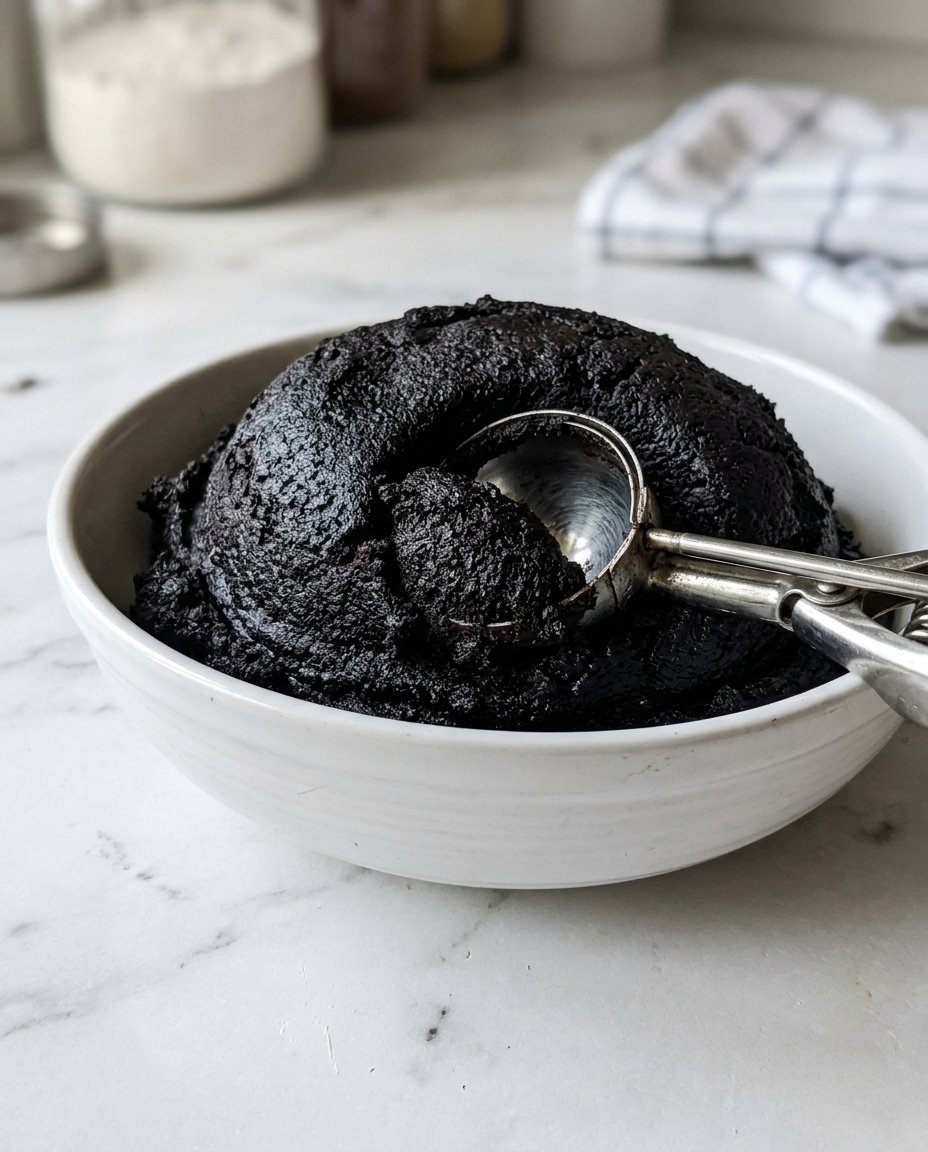
- In a food processor or stand mixer, combine flour, cocoa powder, sugar, salt, baking soda, and baking powder until uniform.
- Add cool butter chunks and pulse until the mixture resembles damp sand, then add the egg and process until a dough mass forms.
- Roll dough into tablespoon-sized balls and place on a parchment-lined baking sheet two inches apart.
- Flatten each ball to 1/8-inch thickness using your palm and chill the tray in the refrigerator for 10 minutes.
- Bake at 375°F (190°C) for 9 to 10 minutes, rotating halfway through, then cool completely on the sheet.
- For the filling, cream the softened butter and vanilla together before gradually adding powdered sugar and salt.
- Beat the filling on high for 2-3 minutes until light and fluffy.
- Pipe or spoon filling onto the flat side of a cooled wafer and press a second wafer on top to finish.
Notes
To ensure the best visual results, seek out black cocoa powder rather than standard Dutch-processed cocoa. If your kitchen is particularly warm, chill the assembled cookies for a few minutes to help the cream filling set firmly before serving.
- Prep Time: 20 mins
- Cook Time: 10 mins
- Category: Dessert
- Method: Baking
- Cuisine: American
The Secret to That Iconic Dark Color\n\nTo achieve the perfect Oreo Copycat Cookies, the choice of ingredients is paramount for both flavor and that specific midnight-black appearance. We use a combination of all-purpose flour for structure and a very specific type of cocoa to get the texture just right. These ingredients work together to ensure your cookies do not turn out hard or bitter.\n\n* All-Purpose Flour (1 1/4 cups / 159g): Provides the necessary structure without making the cookie too heavy. This ratio is key for a cookie that snaps but does not crumble.\n* Black Cocoa Powder (1/2 cup / 43g): This is the secret to the authentic Oreo look. It is heavily alkalized, which removes bitterness and creates a dark, rich profile. If you cannot find black cocoa, Dutch-processed is a good alternative, though the color will be lighter.\n* Unsalted Butter (10 tablespoons / 142g): Using butter at a cool room temperature is vital. It should be pliable but still hold its shape, which prevents the cookies from spreading too much in the oven.\n* Granulated Sugar (1 cup / 200g): This provides sweetness and helps create those crisp, characteristic edges.\n* Large Egg: A single egg at room temperature acts as the binder, giving the dough enough moisture to come together in a cohesive mass.\n* Leavening Agents: A combination of baking soda and baking powder provides just enough lift so the cookies are not dense, while the salt balances the sugar in the filling.
The Process for Perfect Sandwich Cookies\n\n### Step 1: Combine the Dry Bases\n\nIn a food processor fitted with the S-blade or a stand mixer with the paddle attachment, combine your flour, cocoa powder, baking soda, baking powder, salt, and sugar. Pulse or mix on low until the colors are uniform. This step ensures that the leavening agents are distributed evenly throughout the dough, which is essential for a consistent texture across the entire batch.\n\n### Step 2: Incorporate the Fats and Binding\n\nAdd your cool room temperature butter chunks to the dry mixture. Pulse or mix on low speed until the mixture looks like damp sand. Add the egg and continue to process until the dough suddenly clumps together into a single mass. This usually takes about one minute. Avoid over-mixing once the dough has formed, as this can develop too much gluten and result in a tough cookie rather than a crisp one.\n\n### Step 3: Shape and Flatten\n\nScoop the dough into one-tablespoon sized balls and place them on a parchment-lined baking sheet about two inches apart. Dampen your palm slightly and press each ball down until it is about 1/8-inch thick. This uniform thickness is what allows the cookies to bake evenly and achieve that perfect sandwich-ready shape. If the dough feels too soft, you can chill the balls for a few minutes before flattening.\n\n### Step 4: The Critical Chill\n\nPlace the entire tray of flattened dough into the refrigerator for at least 10 minutes. This is a non-negotiable step for texture. Chilling the dough solidifies the fat, which prevents the cookies from thinning out too much during the initial burst of heat in the oven. It preserves the snap and the shape of the copycat design.\n\n### Step 5: Bake and Cool\n\nBake at 375°F (190°C) for 9 to 10 minutes. You will know they are done when they are fragrant and the centers feel set to the touch. Rotate the pans halfway through to ensure even heat distribution. Let them cool completely on the baking sheet to allow the structure to firm up before you attempt to move them.\n\n### Step 6: Prepare the Creamy Filling\n\nWhile the wafers cool, beat your butter and vanilla together until smooth. Gradually add the sifted powdered sugar and salt. Increase the speed to high and beat for 2-3 minutes. This aeration is what makes the filling light and fluffy, contrasting perfectly with the hard chocolate shells. If you want a stiffer filling that stays fresh for days in the jar, ensure your butter was not melted or too warm.\n\n### Step 7: Assembly\n\nPipe or spoon a teaspoon-sized amount of filling onto the flat side of one cookie. Place a second cookie on top and press gently until the cream reaches the edges. For the best texture, serve these the same day they are assembled, or store them properly to maintain the crunch.
Mehmet’s Tips for a Lasting Snap\n\nThe biggest secret to keeping these cookies jar-fresh for days is the thickness of the wafer. If you bake them too thick, they will be chewy like a brownie; too thin, and they will burn. Aim for that perfect 1/8-inch mark. Another tip for success is to use black cocoa for that specific nostalgic taste. For those who enjoy exploring different styles, you can find more inspiration in our Classic Cookie Recipes. Remember that cocoa is quite drying, so if your dough feels too crumbly to hold together, add a teaspoon of water at a time until it reaches a clay-like consistency. This prevents the cookies from cracking during the flattening process. For more detailed techniques on chocolate dough, check out the resources at Handle the Heat.
Creative Twists on a Classic\n\nWhile the standard vanilla filling is iconic, you can easily adapt this recipe to fit your mood. For a minty version, add a half-teaspoon of peppermint extract to the filling and a drop of green food coloring. If you prefer a more modern twist, a peanut butter filling creates a rich, salty-sweet profile that pairs wonderfully with the dark cocoa. For those who need a faster option on busy days, our Quick & Easy Cookies section offers many alternatives. You can also make these double-stuffed by simply doubling the filling recipe and piping a thicker layer between the wafers. If you want a holiday look, roll the edges of the assembled cookies in crushed candy canes or festive sprinkles for a beautiful presentation.
How to Enjoy Your Homemade Treats\n\nThese cookies are the ultimate companion for a tall glass of cold milk. To keep them at their best, I recommend storing them in a vintage glass jar which not only looks beautiful but also helps keep the air out. If you are serving these at a party, they look wonderful arranged on a platter with other selections from our Holiday Cookie Celebrations. For an extra special treat, try crumbling a few of these over a bowl of vanilla bean ice cream; the dark cocoa wafers stay crunchy even against the melting cream. They also make wonderful gifts when wrapped in cellophane with a simple ribbon, proving that homemade is always better than store-bought.

