I remember sitting at Grandma’s sturdy oak table, watching her hands move with a grace that only decades of baking can provide. She would pull a faded, butter-stained index card from her wooden box, the ink nearly gone but the recipe etched perfectly in her mind. Those Sunday afternoons were always filled with the sweet, heady scent of vanilla and the quiet scrape of a wooden spoon against a ceramic bowl. These cookies were her pride, a beautiful swirl of two flavors that made every child in the neighborhood feel like they were receiving a special treasure.

These buttery slice-and-bake treats are a genuine testament to the beauty of simple ingredients handled with care. By using one basic dough divided into two, you create a striking chocolate and vanilla design that looks far more complicated than it actually is. It is a recipe that requires patience and a cool kitchen, but the reward is a batch of cookies that stay fresh in the jar and bring a bit of old-fashioned magic to your table. Whether you are baking for a holiday or just a quiet Tuesday, these sweets carry the warmth of home in every bite.
A Timeless Treasure for Your Cookie Jar
There is something deeply satisfying about a cookie that shows the effort of the baker without needing fancy decorations. These sweets are a classic refrigerator cookie, a style that became popular when home kitchens first welcomed modern cooling. They represent a time when baking was a slow, deliberate act of love, meant to provide a treat that could be sliced and baked at a moment’s notice when a neighbor stopped by for coffee.
Technically, you will love how the crisp edges give way to a tender, melt-in-your-mouth center. The balance between the deep, earthy notes of the cocoa and the floral sweetness of the pure vanilla is perfect. Unlike modern cookies that often rely on too much sugar or candy mix-ins, these focus on the quality of the butter and the texture of the crumb. They are sturdy enough to stand up in a vintage cookie jar but delicate enough to feel like a true indulgence. This recipe is a proven favorite that has stood the test of time, bridging the gap between generations of bakers.
Print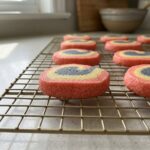
Pinwheel Cookies
- Total Time: 4 hours 25 mins
- Yield: 48 cookies
- Diet: Vegetarian
Description
A nostalgic and visually stunning heritage treat that combines classic vanilla and rich chocolate dough into a beautiful spiral. These buttery slice-and-bake cookies offer a tender, melt-in-your-mouth texture that has been a family favorite for generations.
Ingredients
- 1 cup unsalted butter, softened
- 1 cup granulated sugar
- 1 large egg, room temperature
- 1 large egg yolk
- 2 teaspoons pure vanilla extract
- 3 cups all-purpose flour
- 1/2 teaspoon baking powder
- 1/4 teaspoon salt
- 3 tablespoons cocoa powder
- 1 tablespoon milk
Instructions
- In a large mixing bowl, beat the softened butter and granulated sugar for about 3 minutes until pale and fluffy.
- Add the egg, extra egg yolk, and vanilla extract, then beat on high speed for one minute until smooth.
- Whisk the flour, baking powder, and salt in a separate bowl, then gradually add to the wet ingredients on low speed until just combined.
- Divide the dough into two equal halves; place one half back into the mixer and incorporate the cocoa powder and milk.
- Shape both the vanilla and chocolate doughs into rectangles, wrap in plastic, and refrigerate for 60 to 90 minutes.
- Roll the vanilla dough into an 8×14 inch rectangle on floured parchment, repeat with the chocolate dough, and then place the chocolate layer directly on top of the vanilla.
- Roll the layers tightly starting from the long side to form a log, cut in half for easier handling, and chill the logs for at least 2 hours.
- Preheat oven to 350°F (177°C), slice logs into half-inch rounds, and bake on a lined tray for 14-15 minutes until edges are set.
Notes
To ensure perfectly round cookies, rotate the dough log a quarter turn after every few slices to prevent one side from becoming flat. If the dough becomes too soft or sticky while rolling the layers, place it in the freezer for five minutes to firm up before continuing.
- Prep Time: 40 mins
- Cook Time: 15 mins
- Category: Dessert
- Method: Baking
- Cuisine: American
Pantry Staples for a Heritage Treat
To make these authentic swirls, you only need the honest ingredients that have lived in kitchen cupboards for a hundred years. We do not need anything fancy here—just quality staples that work together to create a reliable and delicious dough.
- Unsalted Butter: Use real butter, softened just enough so your finger leaves a slight indent. This provides the richness and that classic ‘short’ texture.
- Granulated Sugar: This gives the cookies their sweetness and helps create those slightly crisp, golden edges.
- All-Purpose Flour: The backbone of our dough. Make sure to spoon it into your measuring cup and level it off with a knife so the dough isn’t too heavy.
- Large Egg and Extra Yolk: The extra yolk is a little secret for a richer, more tender cookie that doesn’t crumble too easily.
- Pure Vanilla Extract: In a simple recipe like this, the quality of your vanilla really shines through. It provides that nostalgic aroma we all love.
- Cocoa Powder: You can use natural or Dutch-process here. It provides the dark contrast and the deep chocolate flavor for the swirl.
- Baking Powder and Salt: These small additions make sure the cookies rise just enough and that the flavors are perfectly balanced.
- Milk: Just a splash helps incorporate the cocoa into the chocolate half of the dough without making it too dry.
The Classic Way to Create the Swirl
Step 1: Cream the Butter and Sugar
In your favorite large mixing bowl, beat the softened butter and granulated sugar together. You want to keep going for about 3 minutes until the mixture looks pale and fluffy. This step incorporates air, which is vital for the right texture. Scrape the bowl often to make sure every bit is combined.
Step 2: Add the Eggs and Vanilla
Add your room-temperature egg, the extra yolk, and that fragrant vanilla extract. Beat on high speed for about a minute. The mixture should look smooth and well-combined. If your eggs are cold, they might cause the butter to clump, so a little warmth goes a long way here.
Step 3: Mix in the Dry Ingredients
Whisk your flour, baking powder, and salt together in a separate bowl. With the mixer on low, slowly add the flour mixture to the wet ingredients. Mix just until you no longer see streaks of white. The dough will be thick and a bit sticky, which is exactly what we want for a tender cookie.
Step 4: Divide and Flavor the Dough
Take the dough out and weigh it if you have a scale, or just eyeball it into two equal halves. Put one half back into the bowl. Add your cocoa powder, milk, and a pinch of espresso powder if you like a deeper chocolate taste. Mix on low until the color is even and beautiful.
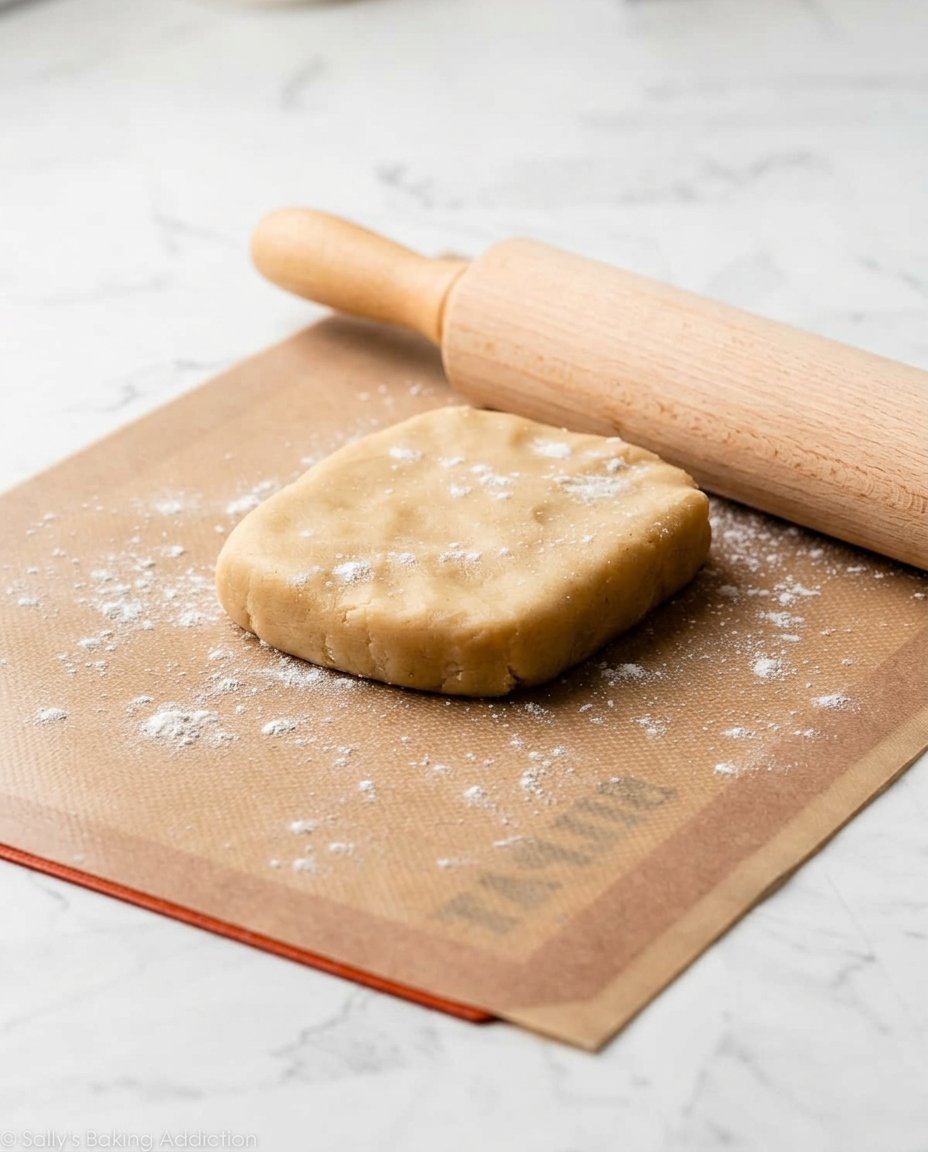
Step 5: The First Chill
Lightly flour your hands and pat each dough half into a rectangle about an inch thick. Wrap them snugly in parchment or plastic wrap. Place them in the refrigerator for 60 to 90 minutes. You want the dough to be firm enough to handle but still pliable enough to bend without snapping.
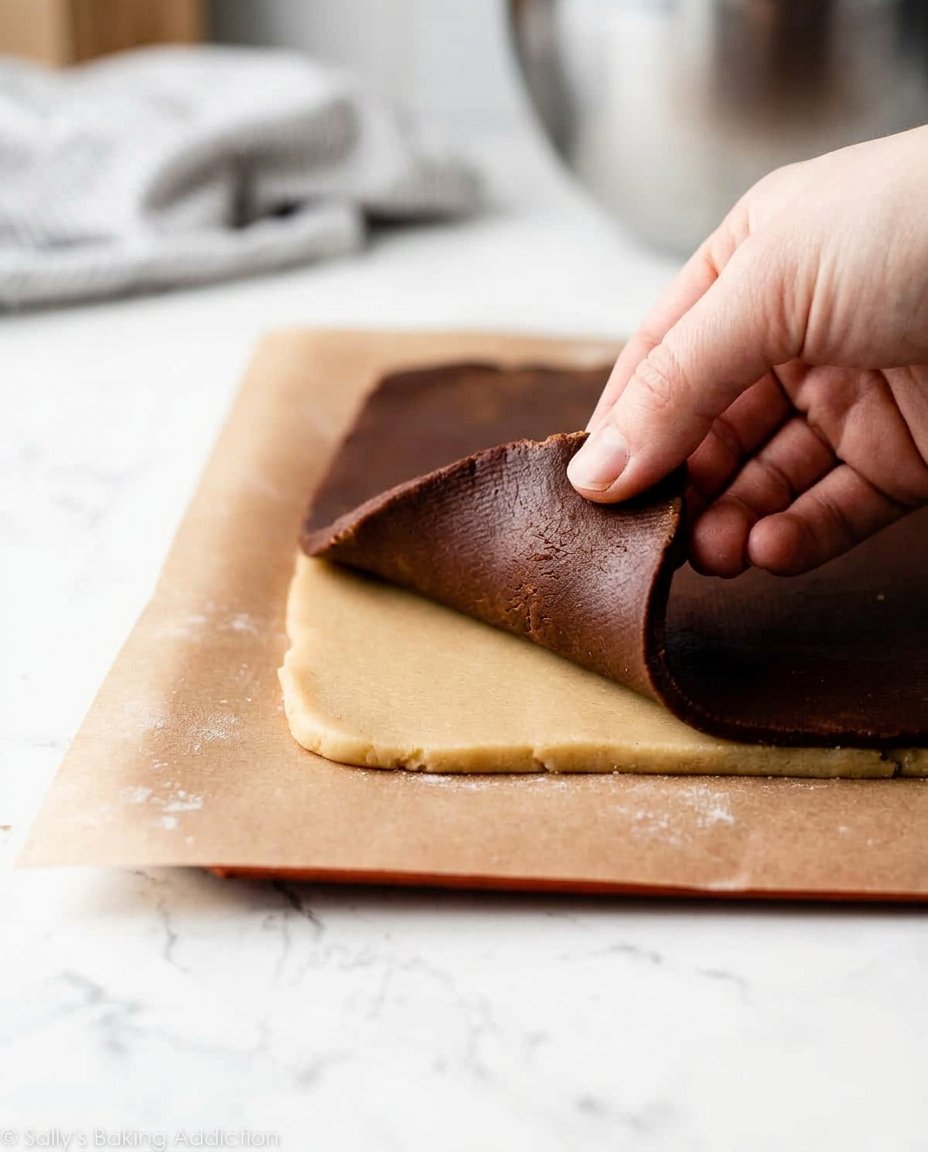
Step 6: Roll the Layers
On a piece of floured parchment, roll the vanilla dough into a large rectangle, about 8 by 14 inches. Set it aside and roll the chocolate dough to the same size on another piece of parchment. Carefully flip the chocolate dough onto the vanilla dough. Peel back the paper and pat them together gently to remove any trapped air.
Step 7: Create the Log
Starting from the long side, roll the two layers together tightly. Use the parchment paper to help you lift and guide the dough as you go. If the dough cracks a little, just use your fingers to pinch it back together. Cut the long log in half so you have two manageable pieces.
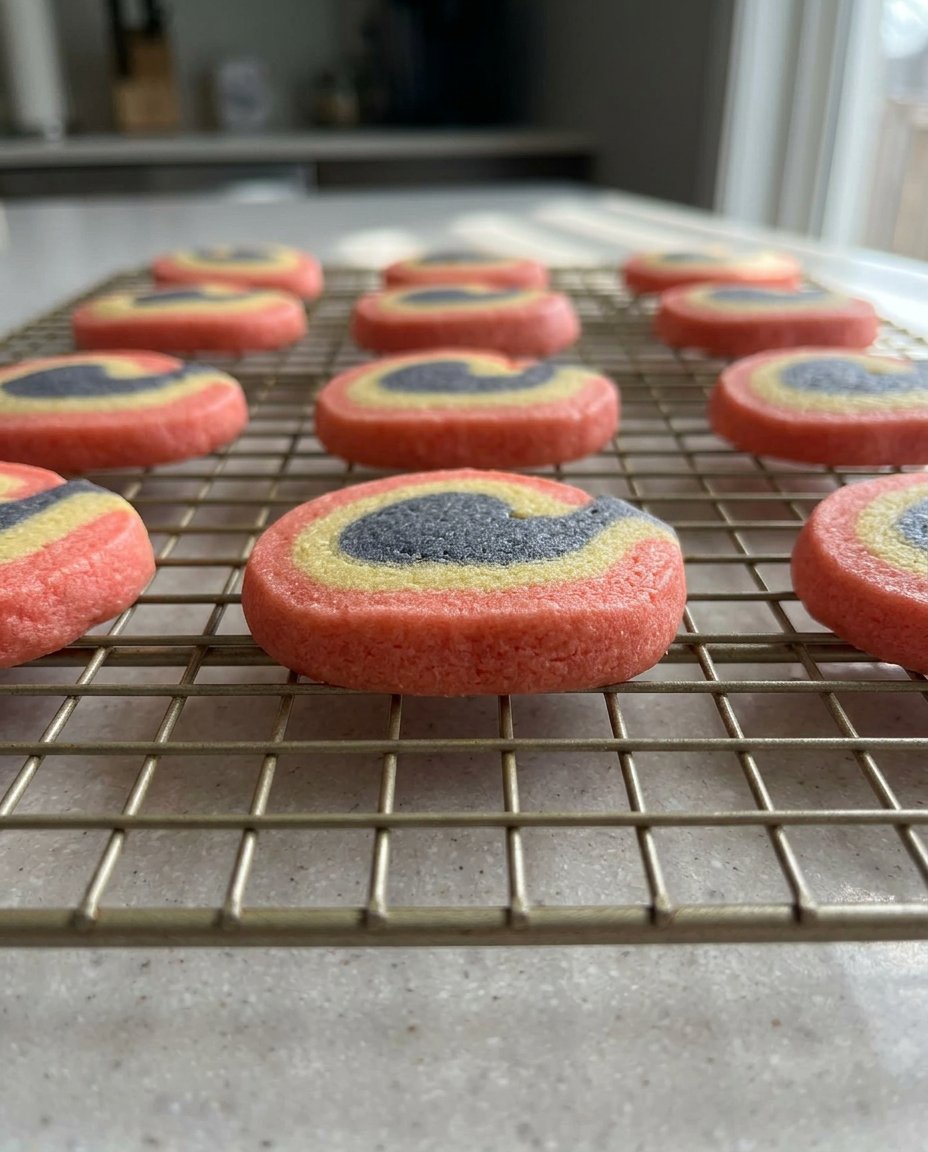
Step 8: The Final Chill and Bake
Wrap your logs and chill them for at least 2 hours. This is the secret to getting clean, sharp slices. When you are ready, preheat your oven to 350°F (177°C). Slice the logs into half-inch rounds and place them on a lined baking sheet. Bake for 14-15 minutes until the edges are just barely starting to turn golden.
Grandma’s Secrets for Perfect Pinwheels
One of the most important things to remember is the temperature of your dough. If the dough gets too warm while you are rolling it, it will become sticky and the layers will smudge. If this happens, simply slide the whole sheet of parchment onto a baking tray and pop it in the freezer for five minutes. Patience is a virtue in heritage baking, and letting the dough rest makes all the difference in the final look.
When slicing, use a very sharp, thin knife. Do not saw back and forth; instead, use one clean downward motion. Rotate the log a quarter turn after every few slices to keep it from getting a flat side. For more wisdom on keeping your kitchen traditions alive, look at our Classic Cookie Recipes for more timeless techniques. Also, if you find your layers are sliding apart, a tiny bit of water brushed between the vanilla and chocolate sheets can act as a natural glue to hold the swirl together.
Family Favorites and Heritage Twists
While the chocolate and vanilla swirl is the most traditional version, many families have added their own unique touch over the years. You can replace the vanilla extract in the white dough with peppermint extract and use a few drops of red gel food coloring to create a festive ‘candy cane’ pinwheel for the holidays. Some folks like to roll the finished log in coarse sparkling sugar or tiny nonpareil sprinkles before slicing to give the edges a bit of crunch and shine.
For a nuttier flavor, you can finely grind walnuts or pecans and press them into the dough layers before rolling. If you want to see how these fit into a larger spread of treats, see our guide on Holiday Cookie Celebrations. For a more modern take on the flavor profile, you might find inspiration in this pinwheel cookies guide which discusses different dipping options like white chocolate or dark ganache.
Sharing the Tradition
These cookies are meant to be shared over a pot of coffee or a cold glass of milk. I love to stack them in a clear glass jar on the counter so everyone can see the beautiful spirals. They are the perfect addition to a Sunday afternoon tea or a neighborhood potluck where you want to bring something that feels personal and handcrafted.
If you are giving these as a gift, place them in a tin lined with parchment paper to keep them crisp. They hold up remarkably well, making them ideal for mailing to loved ones far away. For more ideas on how to present your bakes beautifully, check out our section on Cookie Decorating Traditions. Serving them alongside a few fresh berries or a small scoop of vanilla bean ice cream can turn a simple cookie into a proper heritage dessert.
The Sweet Heritage of Baking
Baking these cookies is more than just following a recipe; it is about slowing down and honoring the methods that have brought joy to families for generations. When you pull that warm tray out of the oven and see those perfect chocolate swirls, you are carrying forward a tradition of handmade love. These treats remind us that the best things in life often take a little time and a lot of heart. For more ways to fill your kitchen with warmth, look through our Quick & Easy Cookies collection. Please share your baking memories with us on Pinterest and Instagram. We would love to see your kitchen creations and hear about your own family traditions. Happy baking, from my kitchen to yours.
