I remember the frustration of opening a cookie jar only to find once-perfect treats turned into dry, crumbly stones. This recipe fixes that by using browned butter and a secret chilling stage to keep these Biscoff Cookies incredibly soft for nearly a week. It’s a modern texture twist on a flavor that feels like it’s been in the family for decades.

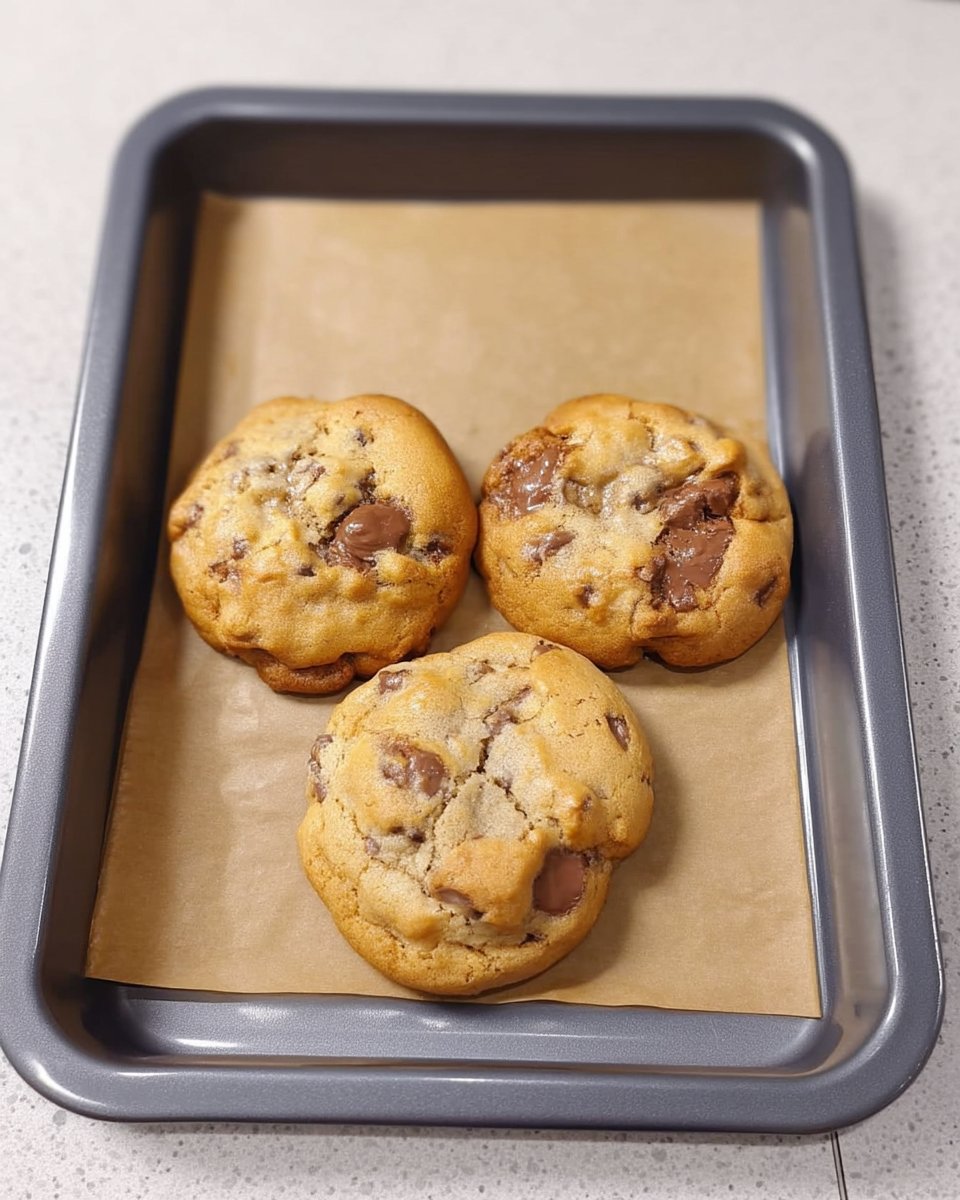
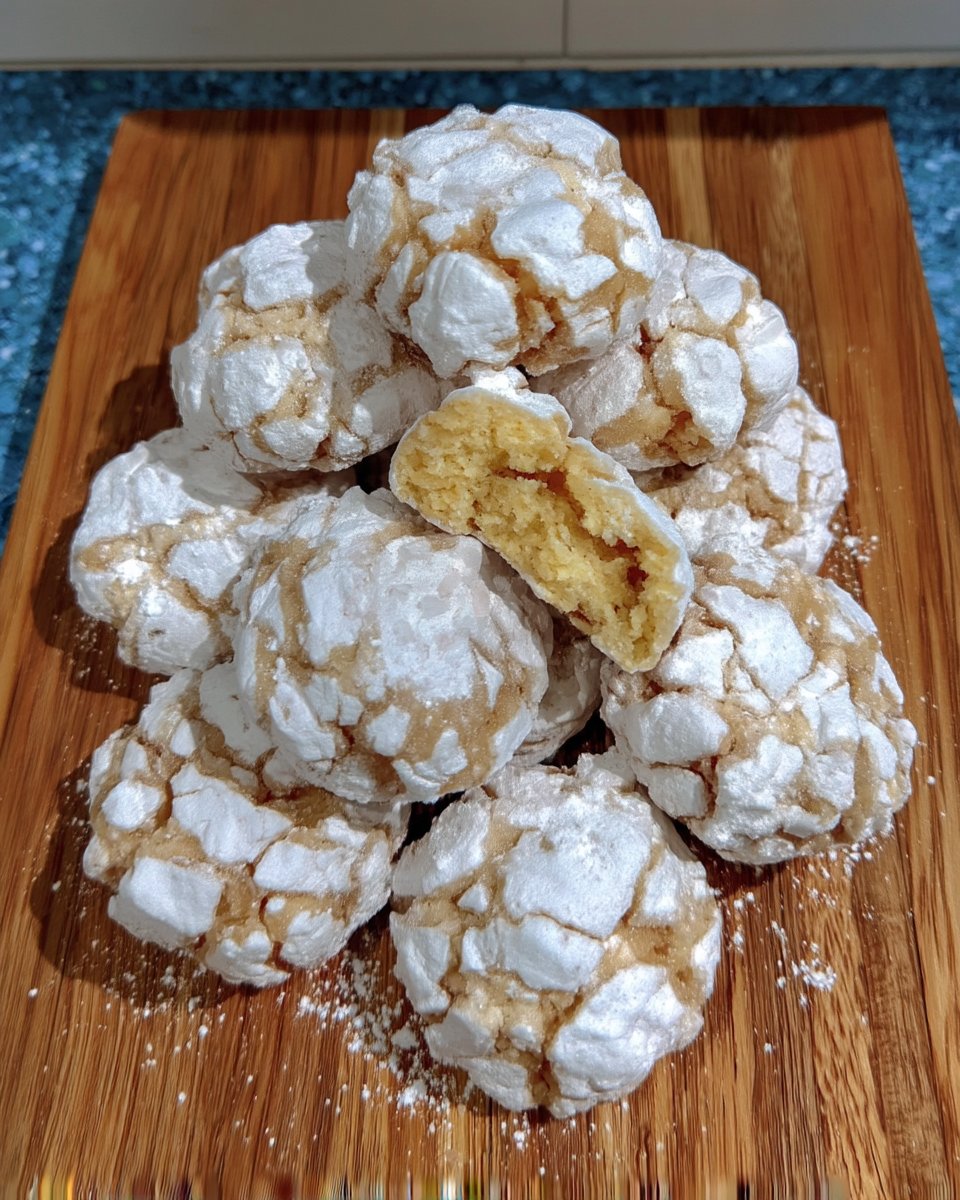
These aren’t just your average spiced cookies; they are oversized, bakery-style wonders stuffed with a molten Biscoff core. The combination of warm spices and white chocolate creates a chewy, fudgy bite that stays fresh and satisfying long after they leave the oven.
A Perfect Treat for Any Occasion
You will love these cookies because they solve the age-old problem of the stale cookie jar. Most vintage recipes lose their moisture by the second morning, but thanks to my specific texture tweaks, these stay soft and chewy for a full week. We are talking about massive, 150g cookies that feel like a meal in themselves, offering a satisfying weight and a dense, fudgy crumb.
The flavor profile is deep and complex. By browning the butter first, we create a nutty base that perfectly complements the cinnamon, ginger, and allspice found in the Biscoff spread. The addition of white chocolate chips provides a creamy sweetness that cuts through the warm spices. Best of all, that hidden center of pure Biscoff spread stays gooey, providing a wonderful surprise in every single bite. These are the cookies people will ask you for at every gathering, and you can be sure they will be just as tender on day four as they were on day one.
Print
Biscoff Cookies
- Total Time: 14 hours
- Yield: 8 cookies
- Diet: Vegetarian
Description
These oversized, bakery-style Biscoff cookies feature a molten cookie butter core and a rich, browned butter base for a deep, nutty flavor. Expertly crafted for lasting softness, they combine warm spices with creamy white chocolate to create a chewy, fudgy treat that stays fresh for a full week.
Ingredients
- 8 tablespoons Biscoff spread (for stuffing)
- Unsalted butter, browned and cooled
- Light brown sugar
- Granulated white sugar
- 1 large egg
- 1 extra egg yolk
- Vanilla extract
- All-purpose flour
- Cornstarch (cornflour)
- Baking powder
- Baking soda
- Salt
- Ground cinnamon
- Ground ginger
- Ground allspice
- White chocolate chips
Instructions
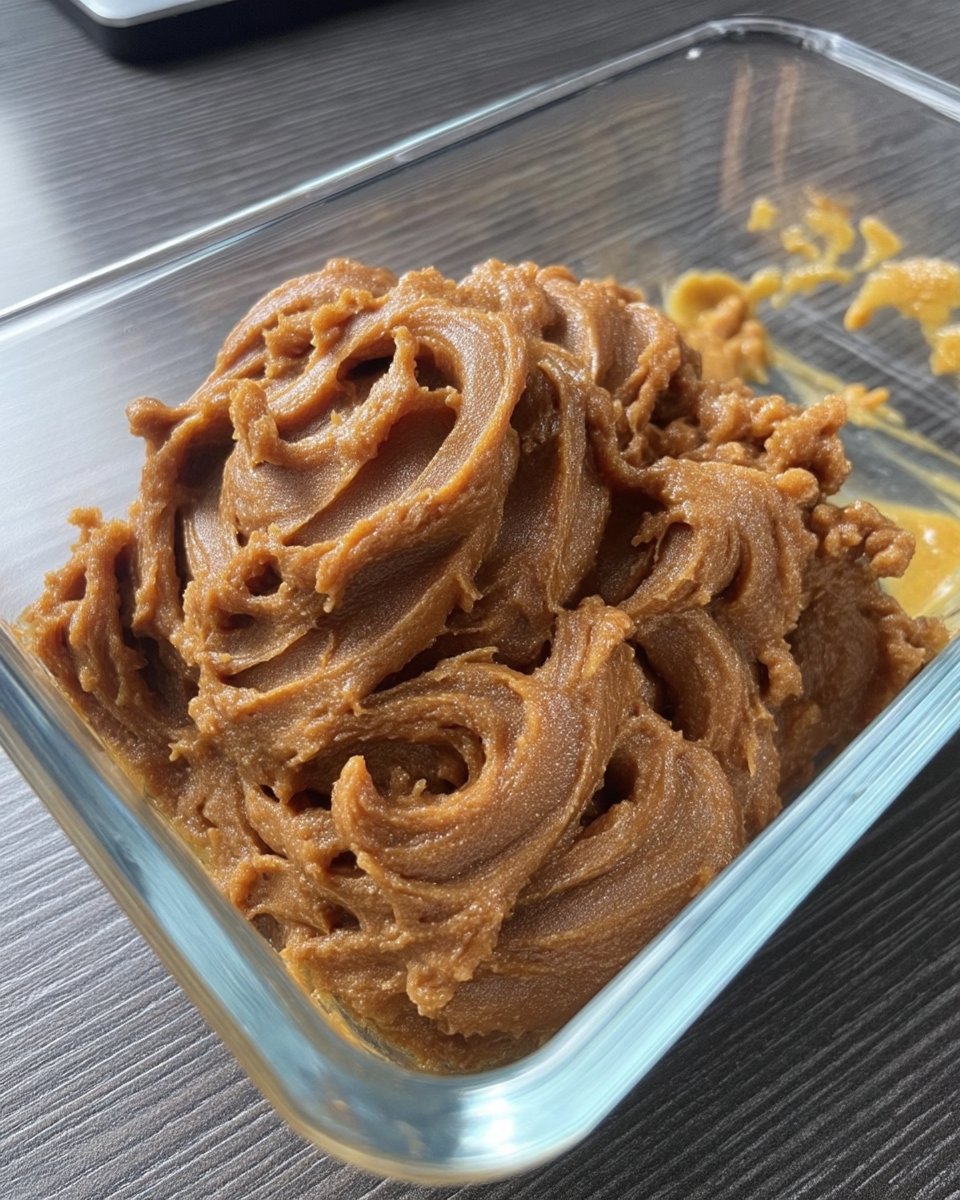
- Freeze eight generous tablespoons of Biscoff spread as small discs on a parchment-lined tray for at least one hour until firm.
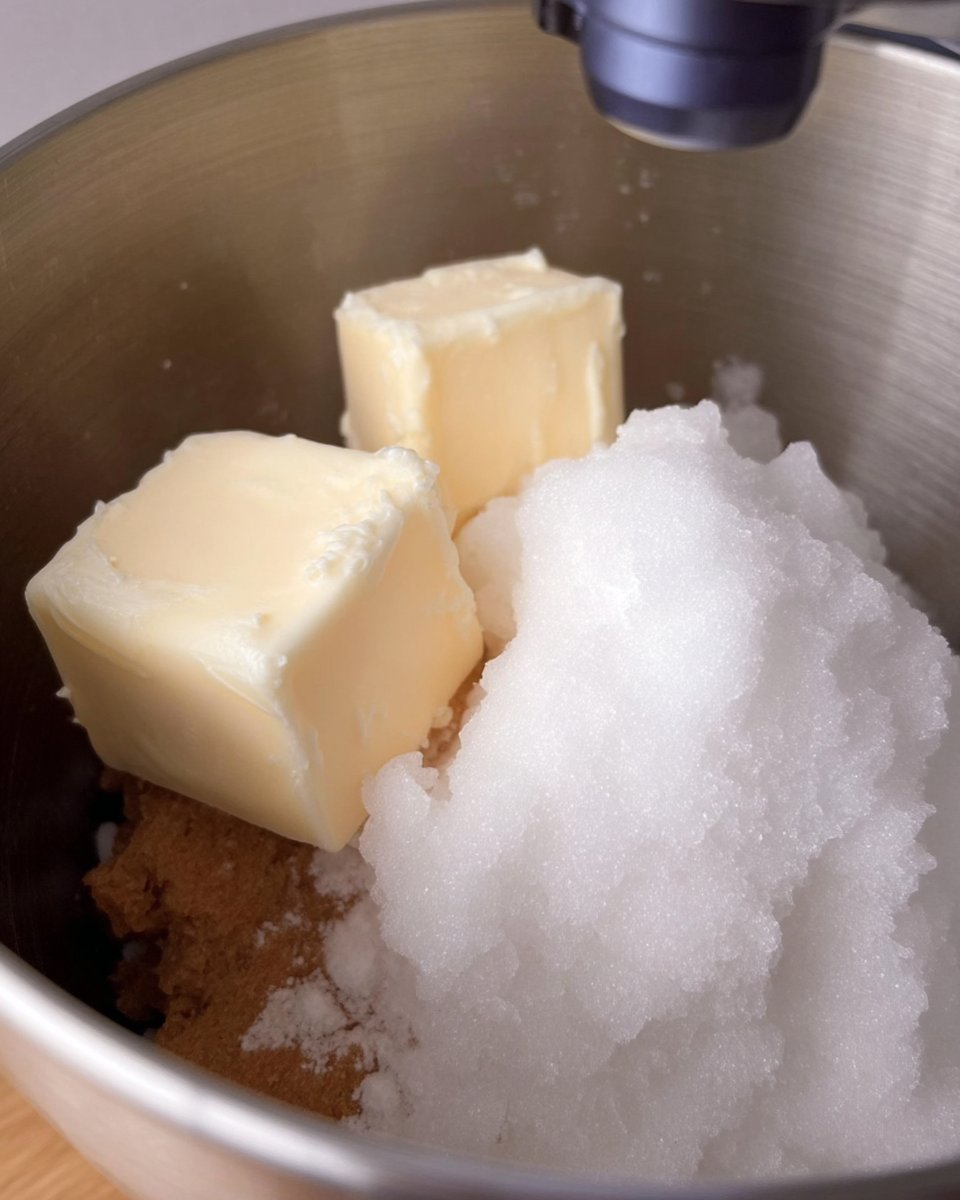
- Brown the butter in a saucepan over medium-high heat until golden specks appear, then transfer to a bowl and cool for 45 minutes to room temperature.
- Stir the brown and white sugars into the cooled butter, then mix in the whole egg, extra yolk, and vanilla until smooth and glossy.
- Whisk the flour, cornstarch, baking powder, baking soda, salt, and spices in a separate bowl before folding them into the wet mixture along with the white chocolate chips.
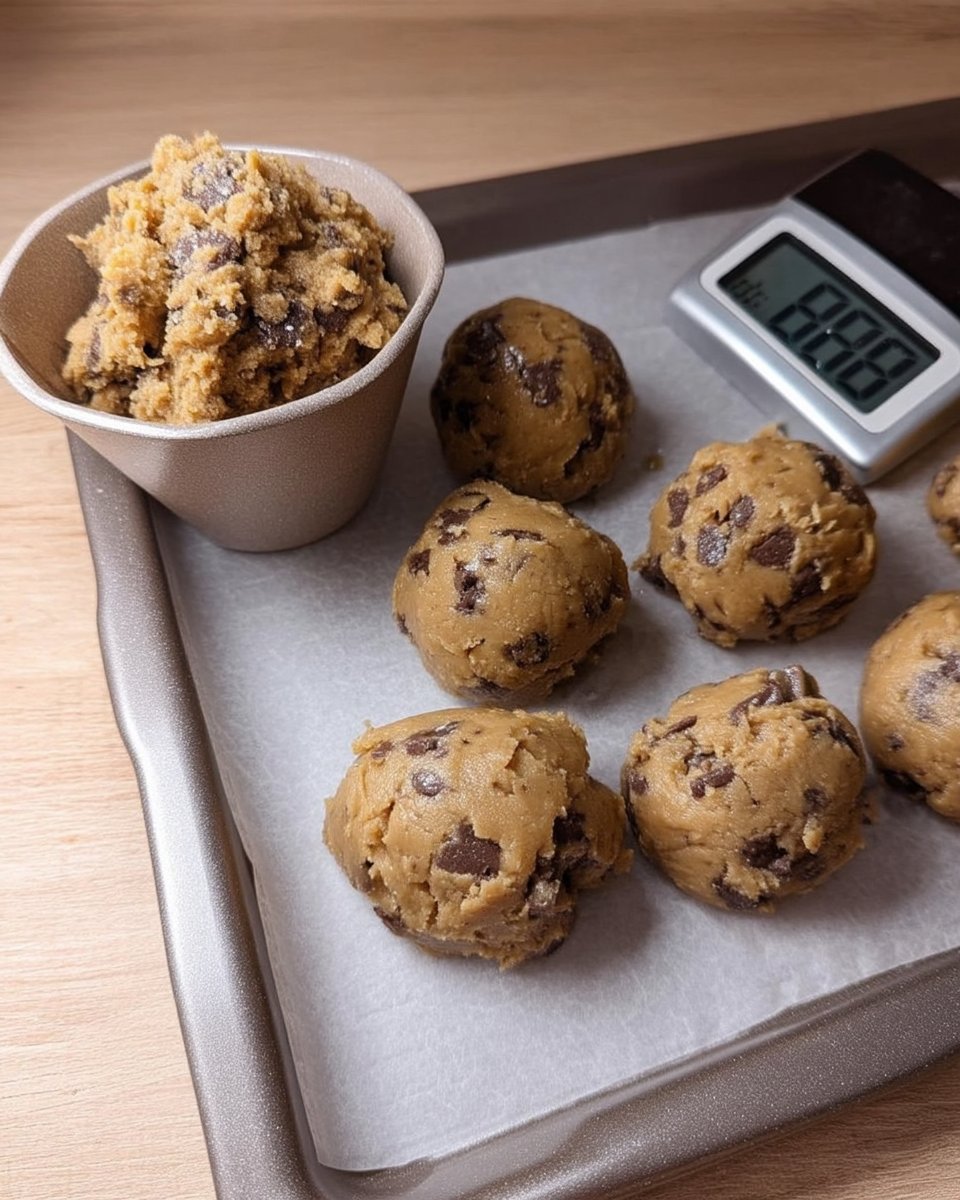
- Divide the dough into eight 125g portions, flatten each, place a frozen Biscoff disc in the center, and seal the dough around it into a tall dome.
- Place the dough balls in an airtight container and refrigerate for 12 to 24 hours to allow the flour to hydrate and the fats to solidify.
- Preheat the oven to 180°C (350°F) and bake the cold cookies for 18 to 19 minutes, then let them rest on the tray for 20 minutes before serving.
Notes
For the most consistent results, use a digital kitchen scale to weigh your dough portions to exactly 125g. To maintain the molten center, avoid over-baking the cookies; they should look slightly pale on top when removed from the oven as they will finish setting on the hot tray.
- Prep Time: 2 hours
- Cook Time: 20 mins
- Category: Dessert
- Method: Baking
- Cuisine: American
The Secrets to Lasting Softness
To achieve a cookie that resists drying out, we have to look closely at our moisture-retaining ingredients. This recipe relies on a high ratio of brown sugar and an extra egg yolk to ensure the center remains tender while the edges develop a slight, golden crispness.
- Biscoff Spread: We use this both in the dough and as a frozen stuffing. The oils in the spread help keep the cookie moist from the inside out.
- Unsalted Butter: We brown this to remove water and concentrate the fats, which creates a much richer mouthfeel and a chewy, rather than cakey, texture.
- Brown Sugar: This is the hero of moisture. The molasses content in light brown sugar draws in humidity, preventing that dreaded day-two crunch.
- Cornstarch (Cornflour): This is my favorite texture trick. A small amount softens the proteins in the all-purpose flour, giving you a tender, professional-bakery bite.
- Egg Yolk: Adding one extra yolk provides the fat necessary to make the dough feel rich and fudgy without making it rise like a cake.
- Spices: Cinnamon, allspice, and ginger are added to the dough to mirror the flavor of the spread, ensuring the spice notes are present in every layer of the cookie.
- White Chocolate Chips: These act as little pockets of creamy sweetness, balancing the deep, toasted notes of the browned butter.
The Texture-Perfect Method
Step 1: Prepare the Molten Core
Before you even touch the oven, you need to handle the stuffing. Dollop eight generous tablespoons of Biscoff spread onto a parchment-lined tray. I recommend spreading them into small discs about half an inch thick. Pop these in the freezer for at least one hour. They need to be firm enough to handle so they don’t dissolve into the dough during the assembly process.
Step 2: The Browned Butter Base
Place your butter in a light-colored saucepan over medium-high heat. As it melts and begins to simmer, stir occasionally. You are looking for the moment it foams up and you see little golden specks appearing at the bottom. It should smell nutty and rich. Immediately pour it into a heatproof bowl, making sure to scrape out every single one of those golden bits—that is where the flavor lives. Let it cool for about 45 minutes until it reaches room temperature. If it’s too hot, it will melt your chocolate chips later.
Step 3: Mixing the Wet Ingredients
Once the butter is cool, stir in both the brown and white sugars using a wooden spoon. You don’t need a mixer here; we want to keep the air out to ensure a dense, chewy cookie. Add the whole egg, the extra yolk, and the vanilla extract. Mix until the texture looks smooth and shiny, almost like a thick caramel sauce. This stage ensures the sugars are well-distributed for even baking.
Step 4: Incorporating the Dry Goods
In a separate bowl, whisk together your flour, cornstarch, baking powder, baking soda, salt, and spices. Slowly add this to your wet mixture. Stir until the flour is almost gone, then fold in your white chocolate chips. Mixing by hand allows you to feel the dough’s resistance, ensuring you don’t overwork the gluten, which can make cookies tough.
Step 5: Stuffing and Shaping
Divide your dough into eight equal portions (about 125g each). Take a ball of dough, flatten it in your palm, and place one of your frozen Biscoff discs in the center. Carefully wrap the dough around the spread, sealing any cracks. Shape them into tall domes with a flat base. This height is intentional—it keeps the center soft while the edges get that perfect golden color.
Step 6: The Mandatory Chill
Place your dough balls in an airtight container and refrigerate them for at least 12 hours. I know it’s hard to wait, but this is the secret to the best flavor and texture. The flour fully hydrates during this time, and the fats solidify, preventing the cookies from spreading too thin in the oven. If you only have two hours, that’s okay, but 12 to 24 hours is where the magic happens.
Step 7: The Final Bake
Preheat your oven to 180°C (350°F). Place your fridge-cold cookies on a lined baking tray, spacing them well apart. Bake for 18 to 19 minutes. The edges should be golden, but the tops should still look a bit pale and soft. They will finish setting on the hot tray after you take them out. Let them cool for 20 minutes before moving them; this patience is rewarded with a perfect, fudgy texture.
Mehmet’s Texture Secrets
To ensure your cookies stay soft for days, never overbake them. When you pull them out of the oven, they should look slightly underdone in the center. The residual heat from the baking sheet will finish the job without drying out the crumb. Also, make sure to use a silver or light-colored pan when browning your butter so you can accurately see the color of the milk solids. If they turn black, they are burnt and will taste bitter. For more foundational advice on perfecting your bakes, check out my Classic Cookie Recipes. Always store these in a container with a tight seal; even the best cookie will eventually succumb to the air if left out on a plate for too long.
Texture and Flavor Tweaks
If you prefer a cookie with more crunch, you can replace the smooth Biscoff spread with the crunchy version for the stuffing. This adds a delightful textural contrast against the soft dough. You can also experiment with the chocolate; dark chocolate chips offer a sophisticated bitterness that pairs beautifully with the sweet spices. If you need something faster and don’t have time for the stuffing step, you can simply swirl the spread into the dough for Quick & Easy Cookies. Another favorite of mine is adding a pinch of flaky sea salt on top immediately after baking to highlight the buttery notes.
How to Enjoy Your Biscoff Treats
These cookies are best enjoyed slightly warm when the center is still molten. If you are eating them a few days after baking, pop one in the microwave for 10 to 15 seconds to revive that fresh-from-the-oven feel. They are wonderful when served with a cold glass of milk or a hot cup of coffee, which helps cut through the richness of the spread. If you are hosting a party, you can learn more about presentation in our guide on Cookie Decorating Traditions. I love placing these in a vintage glass jar on the counter; they look as good as they taste and stay fresh for the whole family to enjoy.
The Texture Truth
Perfecting the Biscoff cookie is about respecting the balance between heat and moisture. By following this method, you are ensuring that your heritage-inspired treats never face the fate of a dry, forgotten cookie. These are meant to be shared and celebrated, bringing a bit of warmth to your kitchen every time you bake. For more seasonal inspiration, see our Holiday Cookie Celebrations. Don’t forget to share your results with our community! You can find us on Pinterest and Instagram to see what other bakers are creating.


