I still remember the way the heavy ceramic lid of Grandma’s cookie jar would clink against the rim every Saturday afternoon. It was a sound that promised something sweet, something buttery, and something made with a whole lot of love. This Copycat Crumbl Chocolate Chip recipe takes me right back to those quiet moments in her sun-drenched kitchen, where the air always smelled of vanilla and hope.

While these cookies have a modern bakery flair, the heart of the recipe is pure heritage baking. They are thick, soft, and substantial, just like the treats we used to save for special Sunday gatherings. Every bite is a reminder that some traditions are worth keeping, and a full cookie jar is the best way to welcome family home.
A Timeless Classic for Your Cookie Jar
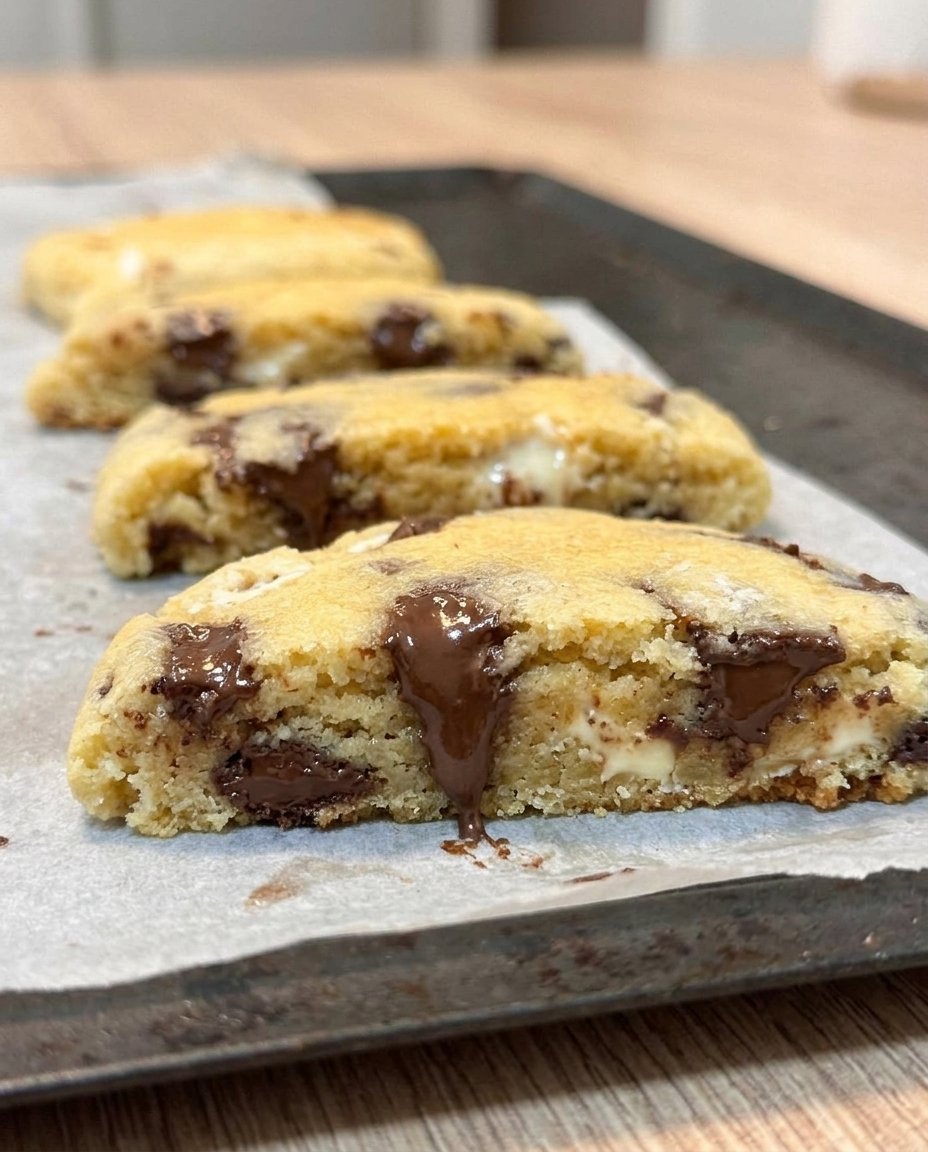
There is something truly special about a cookie that feels like a meal in itself. This recipe captures that specific magic—a soft, almost doughy center paired with golden, crisp edges that provide the perfect crunch. It is a hearty treat that stands tall, much like the heirloom recipes passed down through my family for decades.
You will love these because they use simple pantry staples to create something extraordinary. We do not need fancy equipment or hard-to-find ingredients to make a batch that tastes like it came from a professional bakeshop. It is all about the technique and the patience to let the butter and sugar cream together until they are just right.
The milk chocolate chips bring a creamy, nostalgic sweetness that dark chocolate simply cannot match in this specific tradition. It reminds me of the candy bars we used to get at the general store, melted into a buttery dough that holds its shape beautifully. These are cookies meant for sharing, for gifting to neighbors, and for keeping the spirit of home baking alive and well in your own kitchen.
Print
Copycat Crumbl Chocolate Chip
- Total Time: 26 mins
- Yield: 12 large cookies
- Diet: Vegetarian
Description
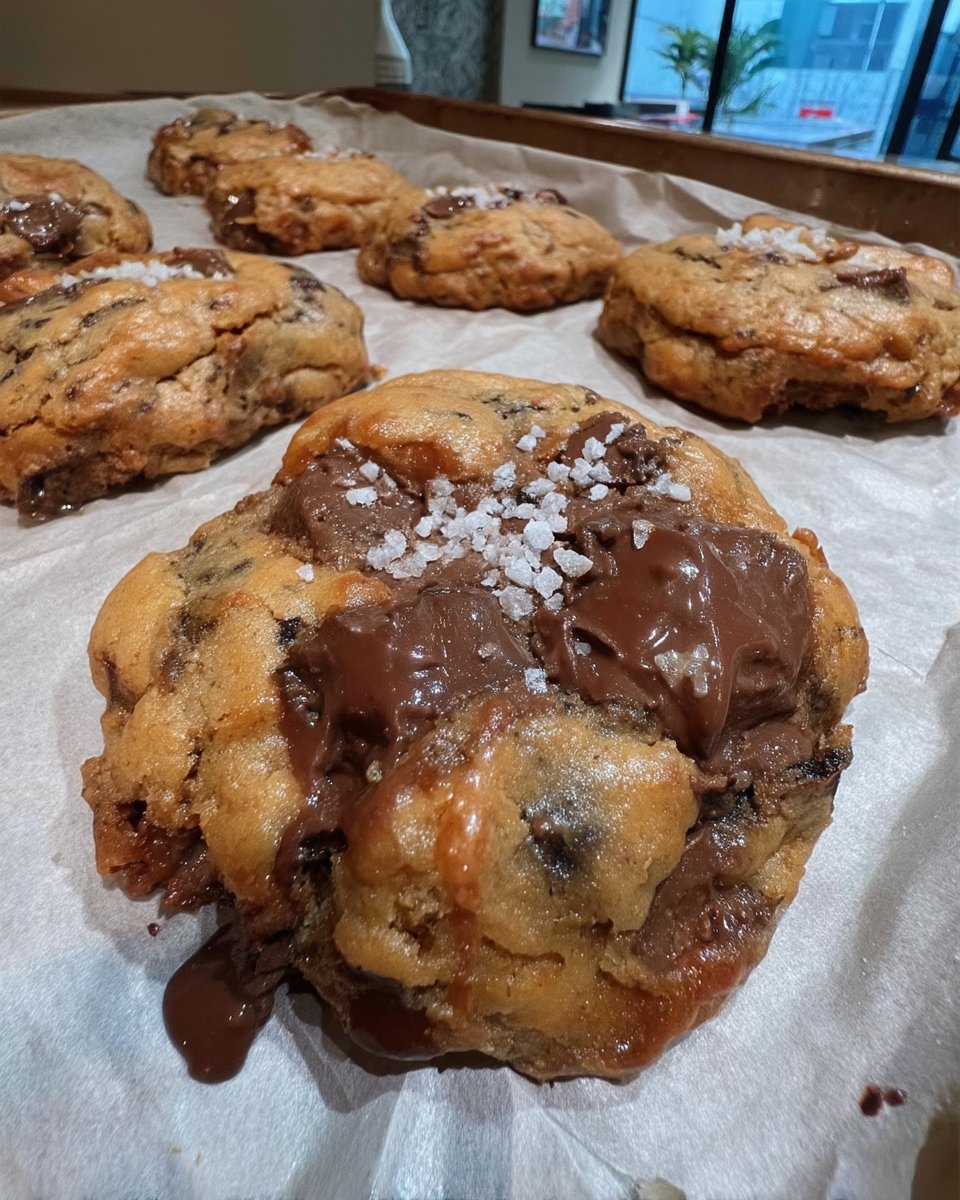
Recreate the iconic bakery experience at home with these thick, doughy chocolate chip cookies featuring a signature craggily top. Perfectly balanced with creamy milk chocolate chips and a hint of vanilla, these substantial treats offer a nostalgic heritage flavor in every bite.
Ingredients
- 1 cup Butter, room temperature
- 1 1/4 cups Light Brown Sugar
- 1/2 cup Granulated Sugar
- 2 large Eggs, room temperature
- 2 teaspoons Vanilla Extract
- 1 teaspoon Baking Soda
- 1/2 teaspoon Salt
- 1 tablespoon Cornstarch
- 3 cups All Purpose Flour
- 2 1/4 cups Milk Chocolate Chips
Instructions
- Preheat your oven to 375°F (190°C) and line a large baking sheet with parchment paper.
- In the bowl of a stand mixer, cream the butter, brown sugar, and granulated sugar on medium speed for 3 minutes until pale and fluffy.
- Add the eggs, vanilla, baking soda, salt, and cornstarch, and mix for 1 minute while scraping down the sides.
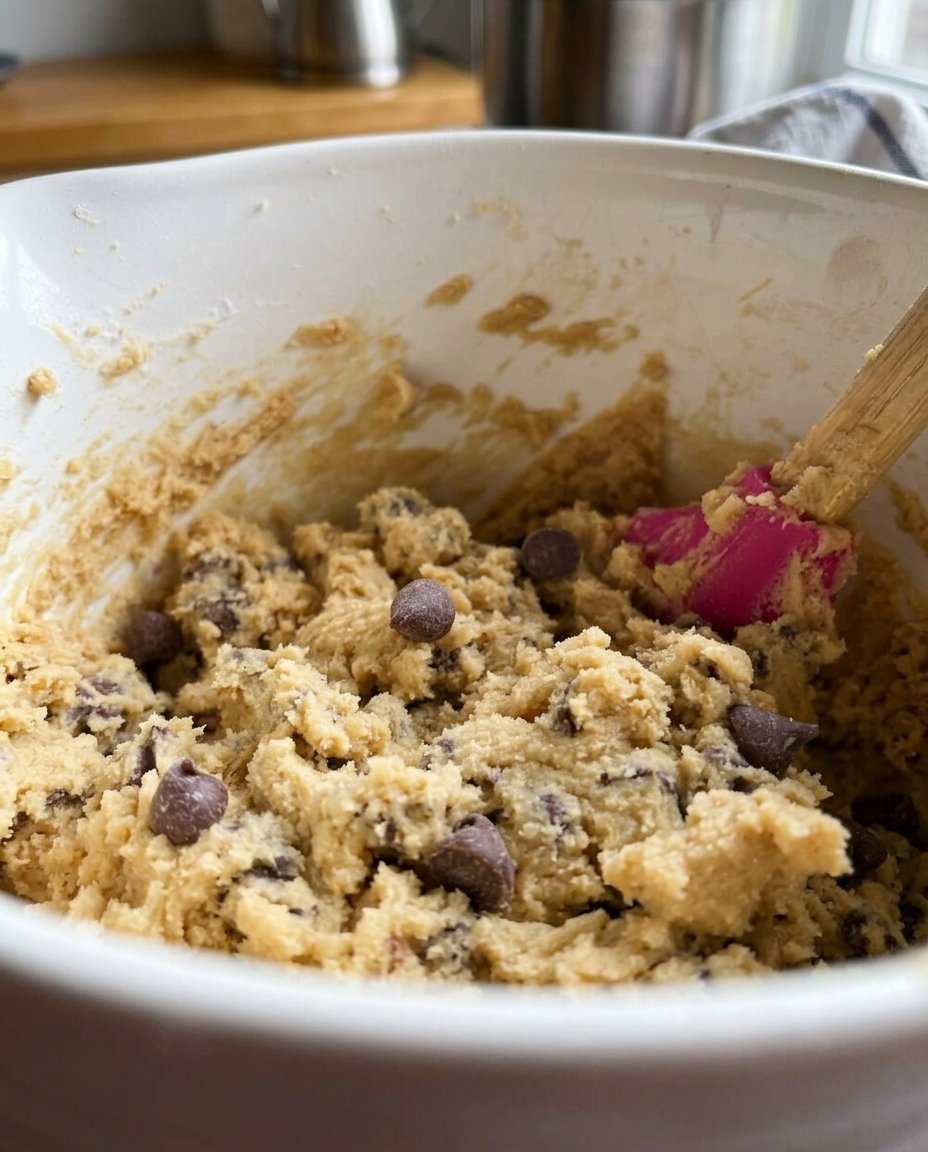
- Turn the mixer to the lowest setting and add the flour, mixing only until just combined, then gently fold in the milk chocolate chips.
- Portion 1/3 cup of dough into balls, break them in half, and press the halves back together with the jagged edges facing upward.
- Place the dough balls 3 inches apart on the baking sheet and bake for 10 to 11 minutes until the edges are just slightly golden.
- Press a few extra chocolate chips into the tops and let them rest on the sheet for 5 minutes before moving to a wire rack.
Notes
For the best results, use the spoon-and-level method to measure your flour, which prevents the cookies from becoming dry. If your dough feels too soft after portioning, chilling it in the refrigerator for 10 minutes before baking will help maintain that characteristic thick, bakery-style structure.
- Prep Time: 15 mins
- Cook Time: 11 mins
- Category: Dessert
- Method: Baking
- Cuisine: American
Simple Pantry Staples for a Hearty Batch
When I look at my old recipe cards, the best ones always rely on the basics we keep in our cupboards. This recipe is no different, using honest ingredients that work together to create a timeless texture and flavor. We start with real butter, which provides the foundation for everything we bake.
- Butter (1 cup): Make sure your butter is at room temperature. It should be soft enough to leave a fingerprint but not so warm that it is greasy. This is the secret to a cookie that doesn’t spread into a flat pancake.
- Light Brown Sugar (1 1/4 cups): This provides the moisture and that deep, caramel-like sweetness we all love in a classic chip cookie.
- Granulated Sugar (1/2 cup): A bit of white sugar helps give those edges the crispness they need to stand up to a glass of milk.
- Eggs (2 large): These should also be at room temperature to ensure they incorporate smoothly into the creamed butter and sugar.
- Vanilla Extract (2 teaspoons): Use the pure stuff if you can. It makes a world of difference in the final aroma of your kitchen.
- Baking Soda & Salt: These are our little helpers. The soda provides lift, while the salt balances the sweetness of the milk chocolate.
- Cornstarch (1 tablespoon): This is a little trick for keeping the cookies soft and thick, preventing them from becoming too tough.
- All Purpose Flour (3 cups): The backbone of our dough. Measure it carefully so the cookies stay tender.
- Milk Chocolate Chips (2 1/4 cups): Large, high-quality chips make these feel like a true bakery treasure.
Using these simple items, you can create a batch of cookies that tastes like a piece of history.
The Heritage Method
Step 1: Setting the Stage
Preheat your oven to 375°F (190°C). Prepare a large baking sheet by lining it with parchment paper. This simple step ensures your cookies never stick and helps them bake evenly without the bottoms getting too dark.
Step 2: The Creaming Ritual
In the bowl of your stand mixer, combine the room temperature butter, light brown sugar, and granulated sugar. Use the paddle attachment and mix on medium speed for a full 3 minutes. You want the mixture to look pale and fluffy, as this air is what gives the cookies their beautiful structure.
Step 3: Gathering the Essentials
Add in the eggs, vanilla extract, baking soda, salt, and cornstarch. Mix for another minute, making sure to stop and scrape down the sides of the bowl. We want every bit of that flavor incorporated so every bite is as good as the first.
Step 4: Incorporating the Flour
Turn your mixer to the lowest setting and slowly add the flour. Mix only until you see the last streaks of white disappear. Over-mixing at this stage can make the cookies tough, and we want them to stay soft and tender. Gently fold in the milk chocolate chips by hand or on the lowest mixer setting.
Step 5: The Craft of the Craggily Top
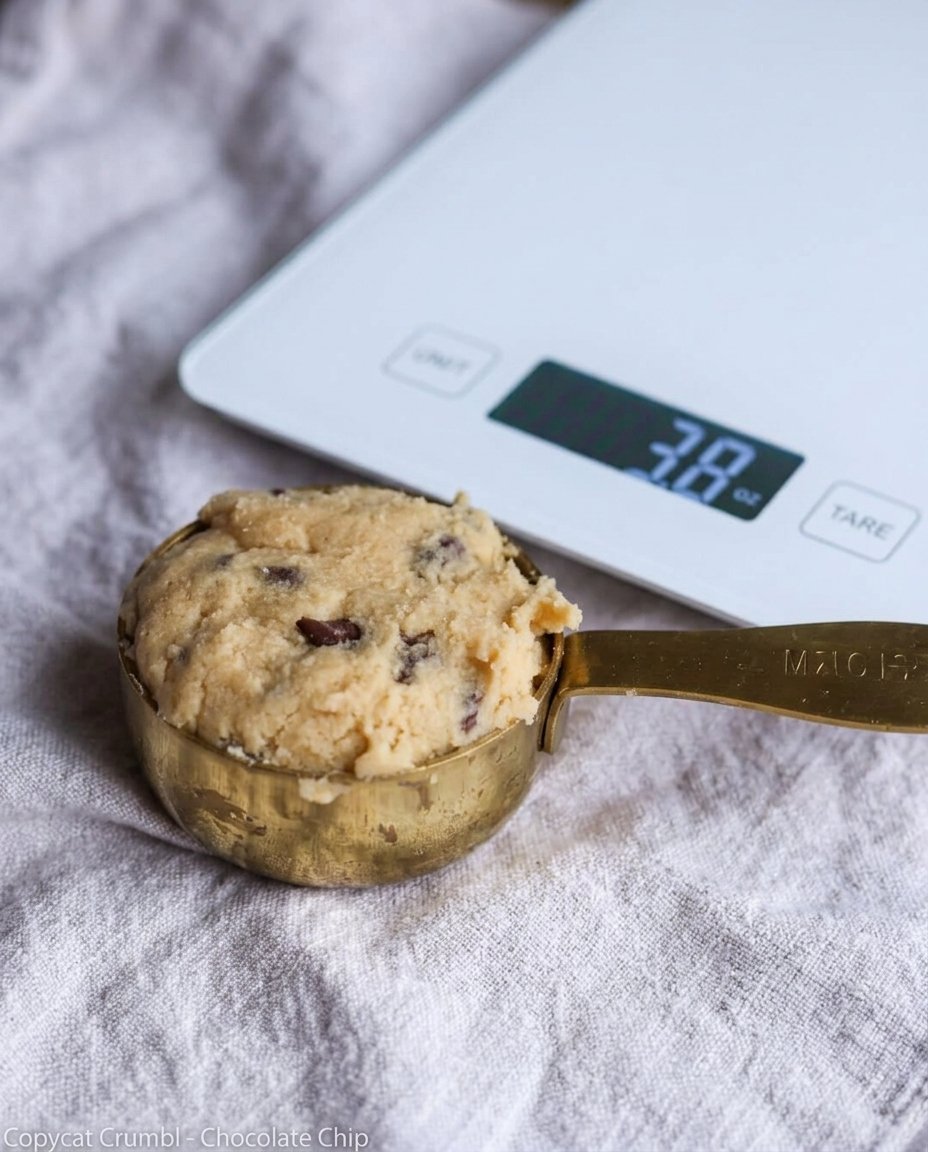
Portion out a rounded 1/3 cup of dough (about 4.2 ounces). Roll it into a smooth ball, then gently break that ball in half. Turn the halves so the jagged, broken edges face upward and press them back together. This creates that wonderful, rustic look that holds extra chocolate chips beautifully.
Step 6: Watching the Golden Glow
Place the dough balls on the prepared sheet, leaving about 3 inches of space between them. Bake for 10 to 11 minutes. You are looking for the edges and the very tops to be just slightly golden. They will look a little soft in the center, but they will firm up as they cool.
Step 7: The Final Touch
As soon as the cookies come out of the oven, press a few extra chocolate chips into the warm tops. Let them rest on the baking sheet for 5 minutes before moving them to a wire rack. This patience allows the structure to set so they don’t break when you pick them up.
Teresa’s Wisdom for the Perfect Bake
One of the most important things I have learned over the years is that temperature is everything. If your kitchen is very warm, your dough might get too soft while you are waiting for the oven. If that happens, just pop the dough in the fridge for ten minutes. This keeps the cookies from spreading too much and ensures they stay thick and proud.
When you are measuring your flour, try to use the spoon-and-level method. Never pack the flour into the measuring cup, or you will end up with a dry, crumbly cookie. For more ideas on handling dough properly, you might enjoy our guide on Quick & Easy Cookies which covers many of these basic kitchen habits.
Lastly, do not be tempted to leave them in the oven for “just one more minute.” These cookies continue to cook on the hot baking sheet once they are pulled out. Trust the timer and the light golden color of the edges for that perfect, melt-in-your-mouth center.
Family Recipe Twists
While the milk chocolate is the classic choice for this recipe, our family has tried many variations over the decades. You can easily swap the milk chocolate for semi-sweet or even dark chocolate chunks if you prefer a less sweet treat. Sometimes, I like to add half a cup of toasted walnuts for a bit of crunch and a nutty depth that reminds me of autumn afternoons.
Another lovely change is to browning the butter before you start. This adds a toasted, almost toffee-like flavor to the dough that is simply divine. For more inspiration on how to change up your baking routine, take a look at our Classic Cookie Recipes for other timeless ideas. You can even sprinkle a tiny pinch of sea salt on top right after baking to bring out the richness of the chocolate.
Sharing the Tradition
These cookies are best served just a little bit warm, when the chocolate is still soft and gooey. I love to set them out on a vintage platter during family gatherings, right next to a big pitcher of cold milk. There is nothing quite like the sight of a full plate of cookies to bring everyone into the kitchen for a chat.
If you are planning to serve these during the holidays, they make a wonderful addition to a dessert spread. You can find more ideas for seasonal displays in our section on Holiday Cookie Celebrations. Whether it is a rainy Tuesday or a festive celebration, these cookies are a beautiful way to show someone you care.
The Sweet Heritage
Baking these cookies is about more than just satisfying a sweet tooth; it is about carrying forward the warmth and comfort of a home-cooked treat. I hope this recipe finds a permanent place in your own collection, written on an index card and tucked away for the next generation to find. For those who love the artistic side of baking, be sure to see our tips on Cookie Decorating Traditions to add a little extra flair to your kitchen adventures.
I would love to see your beautiful bakes! Please share your photos and stories with us on Pinterest, Instagram, and Facebook. There is no greater joy than knowing these recipes are bringing a little bit of Grandma’s kitchen into your own home.

