I remember the first time I tried to recreate my grandmother’s recipe and ended up with a pile of chocolate sand that crumbled the moment I touched it. Most no-bake cookies fail because they lose that fudgy, tender bite within hours of setting, becoming unpleasantly dry in the cookie jar. This version solves the stale problem by focusing on the exact boil time needed to keep the texture soft for days.

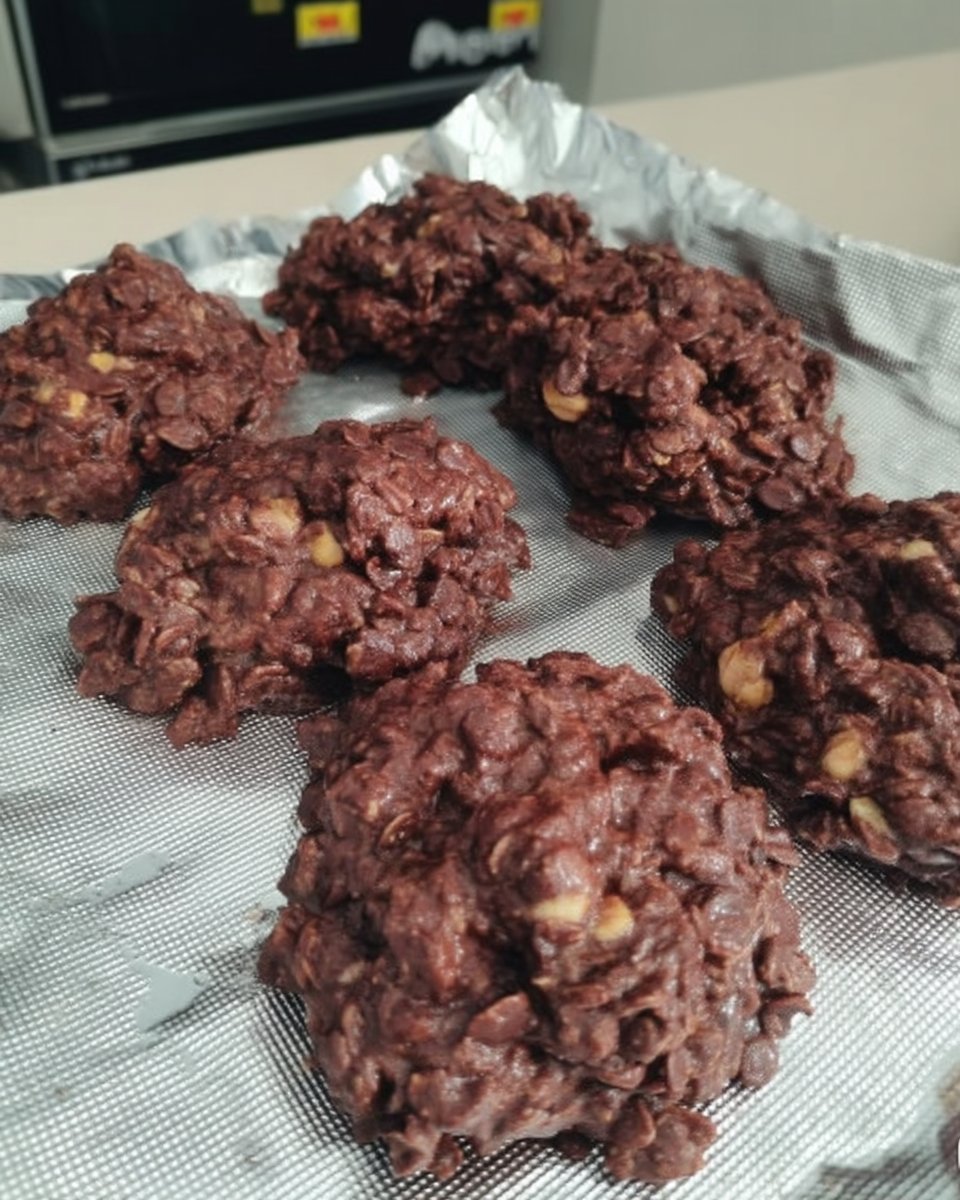
These No Bake Chocolate Oatmeal Cookies are a heritage classic that I have tweaked specifically for better moisture retention. By using the right ratio of peanut butter and sugar, we create a cookie that stays chewy and satisfying even after three days on the counter. It is the perfect project for when you want a nostalgic treat without turning on the oven, especially during those warm summer afternoons.
The Secret to Fudgy No-Bake Success
You are going to love these because they actually stay soft, unlike the brittle versions that often grace potluck tables. This recipe relies on a specific boiling technique that creates a fudge-like base rather than a hard candy shell, meaning your cookies won’t turn into rocks by the next morning. It is a reliable, one-pot method that honors the vintage flavor of Grandma’s kitchen while fixing the common texture issues of the past.
Because they take only twenty minutes from start to finish, they are my go-to when I need a quick fix for a sweet craving. The combination of creamy peanut butter and rich cocoa creates a deep flavor profile that feels much more complex than the simple ingredient list suggests. These are wonderful for lunchboxes or a late-night snack because they maintain their perfect chewiness from the first bite to the last.
Print
No Bake Chocolate Oatmeal Cookies
- Total Time: 20 mins
- Yield: 24 cookies
- Diet: Vegetarian
Description
Experience the perfect fudgy texture with these classic No Bake Chocolate Oatmeal Cookies that remain soft and chewy for days. This reliable recipe uses a specific two-minute boiling technique and creamy peanut butter to ensure a decadent treat that never turns dry or crumbly.
Ingredients
- 2 cups White Sugar
- 1/2 cup Butter or Margarine
- 1/2 cup Milk
- 3 tablespoons Unsweetened Cocoa Powder
- 3 cups Quick-Cooking Oats
- 1/2 cup Peanut Butter
- 1 teaspoon Vanilla Extract
- 1 pinch Salt
Instructions
- Line two large baking sheets with waxed paper or parchment paper and set aside.
- In a medium saucepan, combine the sugar, butter, milk, cocoa powder, and a pinch of salt over medium-high heat.
- Stir the mixture constantly until the butter melts and it reaches a full rolling boil that cannot be stirred down.
- Boil the mixture for exactly 2 minutes, then remove the saucepan from the heat immediately.
- Stir in the quick-cooking oats, peanut butter, and vanilla extract, mixing thoroughly until the oats are well-coated and the peanut butter is melted.
- Drop rounded teaspoonfuls of the mixture onto the prepared paper while the dough is still warm.
- Allow the cookies to sit at room temperature until firm, or place in the refrigerator for 20 minutes for a faster set.
Notes
To ensure success, use a digital timer to start counting the two minutes only once the mixture has reached a vigorous boil that stays bubbling even while stirring. For the best results, stick with quick-cooking oats rather than old-fashioned varieties to maintain a tender, soft bite.
- Prep Time: 10 mins
- Cook Time: 10 mins
- Category: Dessert
- Method: No-Bake
- Cuisine: American
The Building Blocks of Soft Texture
To achieve the perfect No Bake Chocolate Oatmeal Cookies texture, each ingredient plays a specific role in managing moisture and structure. We are not just mixing things together; we are creating a stable emulsion that stays tender.
- White Sugar (2 cups): This provides the structure. When boiled with milk and butter, it creates a syrup that binds the oats without becoming overly crunchy.
- Butter or Margarine (1/2 cup): I prefer real butter for a richer mouthfeel and better fat content, which prevents the cookies from drying out.
- Milk (1/2 cup): The liquid base for our syrup. You can use whole milk for the creamiest results, though 2% also works well for a lighter feel.
- Unsweetened Cocoa Powder (3 tablespoons): This gives us that classic chocolate depth. For a darker, more intense flavor, you can use Dutch-processed cocoa.
- Quick-Cooking Oats (3 cups): These are essential for the soft texture. Unlike old-fashioned oats, quick oats absorb the syrup faster and remain tender rather than chewy or tough.
- Peanut Butter (1/2 cup): This is the secret to the stay-fresh texture. The fats in the peanut butter keep the chocolate from setting too hard, keeping the cookie fudgy.
- Vanilla Extract (1 teaspoon): A splash of vanilla rounds out the sweetness and makes the chocolate flavor pop.
The Two-Minute Texture Method
Step 1: Prep Your Workspace
Gather all your ingredients and measure them out before you start. Because the setting process happens quickly once the oats are added, you need to have everything ready to go. Line two large baking sheets with waxed paper or parchment paper so you can drop the cookies immediately after mixing.
Step 2: The Critical Rolling Boil
In a medium saucepan, combine the sugar, butter, milk, cocoa powder, and a pinch of salt. Place the pan over medium-high heat and stir constantly until the butter melts and the mixture begins to boil. Once it reaches a full rolling boil—where the bubbles cannot be stirred down—start your timer for exactly 2 minutes. This timing is the most important part of the entire recipe for ensuring the cookies set with a soft, fudgy texture.
Step 3: Incorporate the Finishers
As soon as the 2 minutes are up, remove the saucepan from the heat. Immediately stir in the quick-cooking oats, peanut butter, and vanilla extract. Use a wooden spoon to mix everything thoroughly until the oats are completely coated in the chocolate syrup and the peanut butter has melted into a smooth, glossy consistency.
Step 4: Drop and Set
Working quickly before the mixture begins to cool and harden in the pan, drop rounded teaspoonfuls of the dough onto your prepared waxed paper. You can use a small cookie scoop to keep them uniform in size. Let the cookies sit at room temperature until they are completely firm to the touch. If your kitchen is warm, you can slide the trays into the refrigerator for about 20 minutes to help them firm up faster.
Mehmet’s Wisdom for Lasting Softness
The most frequent question I get is about the boil time. If you boil for less than two minutes, the cookies will be gooey and won’t hold their shape. If you go much over two minutes, they will become dry and crumbly. I always suggest using a digital timer rather than guessing. Also, make sure you are using quick-cooking oats; large flake or old-fashioned oats often result in a texture that is too tough for a no-bake treat. If you are looking for more reliable results in your baking, checking out our Classic Cookie Recipes can help you master these traditional favorites. Another tip for success is to avoid making these on a very humid day, as the sugar can absorb moisture from the air and prevent the cookies from setting properly. If you find your cookies are always too dry, try adding an extra tablespoon of peanut butter to the mix to keep things moist.
Texture Tweaks and Flavor Swaps
You can easily adjust this recipe to suit your preferences without losing that signature soft bite. If you enjoy a bit of a crunch, try using extra-crunchy peanut butter instead of smooth. This adds a lovely contrast to the soft oats. For those who want a deeper chocolate experience, substituting the regular cocoa for a dark cacao powder provides a sophisticated bitterness that pairs beautifully with the sugar. You can also find inspiration for lighter versions by looking at our Wholesome Cookie Options. If you want to get creative, try adding half a cup of shredded coconut or chopped walnuts at the same time you add the oats. Just be sure not to add too many dry mix-ins, or you might find the cookies become too fragile to pick up. For a truly vintage feel, some bakers like to add a pinch of cinnamon to the cocoa mixture to give it a warm, spiced undertone. For a slightly different take on this method, you can see how others handle the no bake cookie process to see different ratios.
Keeping Your Cookies Jar-Fresh
These cookies are at their best when served at room temperature, which allows the fudgy texture to shine. I love keeping a batch in a vintage ceramic cookie jar on the counter where they stay fresh for up to five days. If you find they are disappearing too quickly, you can store them in an airtight container with a piece of parchment paper between the layers to prevent sticking. For a quick afternoon treat, they pair perfectly with a cold glass of milk or a hot cup of coffee. If you are planning a party and need more ideas for fast treats, our Quick & Easy Cookies section has plenty of options that fit the bill. These no-bakes are also excellent when chilled, which gives them a firmer, more candy-like snap if that is what you prefer. Just remember that once they come to room temperature, they will return to their soft, original state.
The Final Word on Fudgy Heritage
Mastering the No Bake Chocolate Oatmeal Cookies is a rite of passage for any home baker who values the classics. By focusing on that specific two-minute boil and using peanut butter to lock in moisture, you can keep the tradition alive without the disappointment of dry, crumbly results. These cookies are a testament to the fact that simple ingredients, when handled with a little texture-focused care, can create something truly special that lasts. For more festive ideas on how to share these treats with your loved ones, take a look at our Holiday Cookie Celebrations. We would love to see your successful batches, so feel free to share your photos with us on Facebook or tag us on Instagram. Happy baking, and may your cookie jar always be full of something soft and sweet!

