I remember watching my grandmother spend entire afternoons carefully mixing her famous brown sugar cookies, a labor of love I cherish but simply cannot fit into a busy Tuesday. That warm, molasses-rich aroma always felt like home, but my modern kitchen needs a faster route to that nostalgic comfort. By trading the heavy stand mixer for a couple of mixing bowls and a simple whisk, I found a way to honor her heritage recipe in a fraction of the active prep time. You get all the buttery, plush texture of a classic bakery treat with an incredibly practical method.

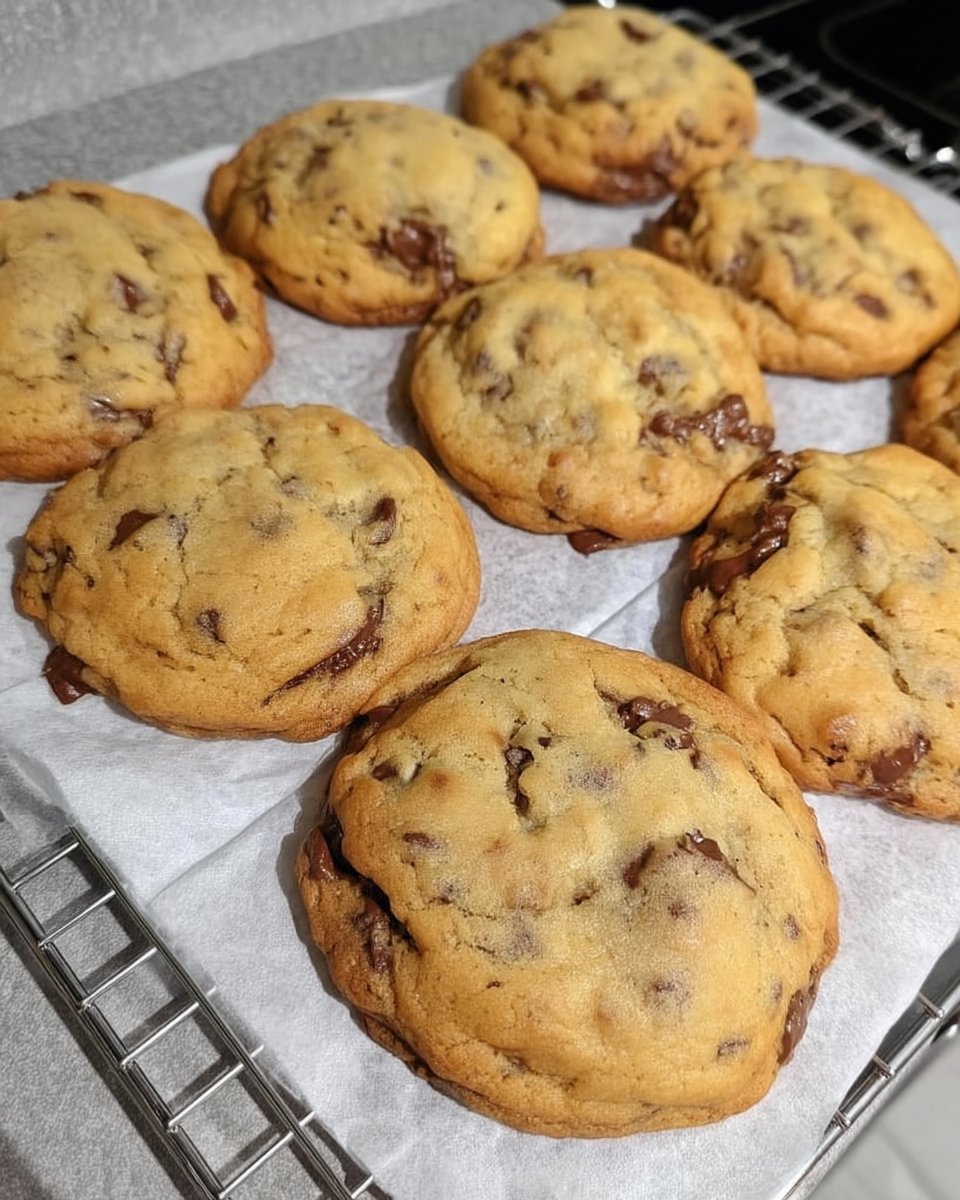
These Brown Sugar Cookies are the ultimate practical bake for anyone who craves deep, caramel-like sweetness without a fussy process. The active hands-on time is just about 15 minutes, relying on simple melted butter and pantry staples you already have on hand. While the dough does require a brief chill in the fridge to develop that thick, chewy center, the actual physical work is wonderfully straightforward. It is a reliable, comforting drop cookie that delivers vintage flavor to your modern cookie jar.
Quick Classic: Why You’ll Love This
There is something truly wonderful about a recipe that asks for so little active effort yet yields such spectacular, bakery-quality results. These cookies capture that deeply comforting, old-fashioned flavor profile we all crave when we think of family baking traditions. The secret lies in the generous amount of brown sugar, which brings a chewy texture and a rich, molasses-forward sweetness to every single bite. You get the warmth of a classic recipe without the exhaustion of an all-day baking project.
Modern baking is all about finding smart shortcuts that preserve that essential heritage quality, and this recipe delivers exactly that. By using melted butter instead of waiting around for sticks to soften at room temperature, you cut out a massive hurdle right from the start. This simple switch means you can satisfy a sudden cookie craving or prep for a school bake sale on a moment’s notice. It is the perfect balance of vintage taste and modern speed.
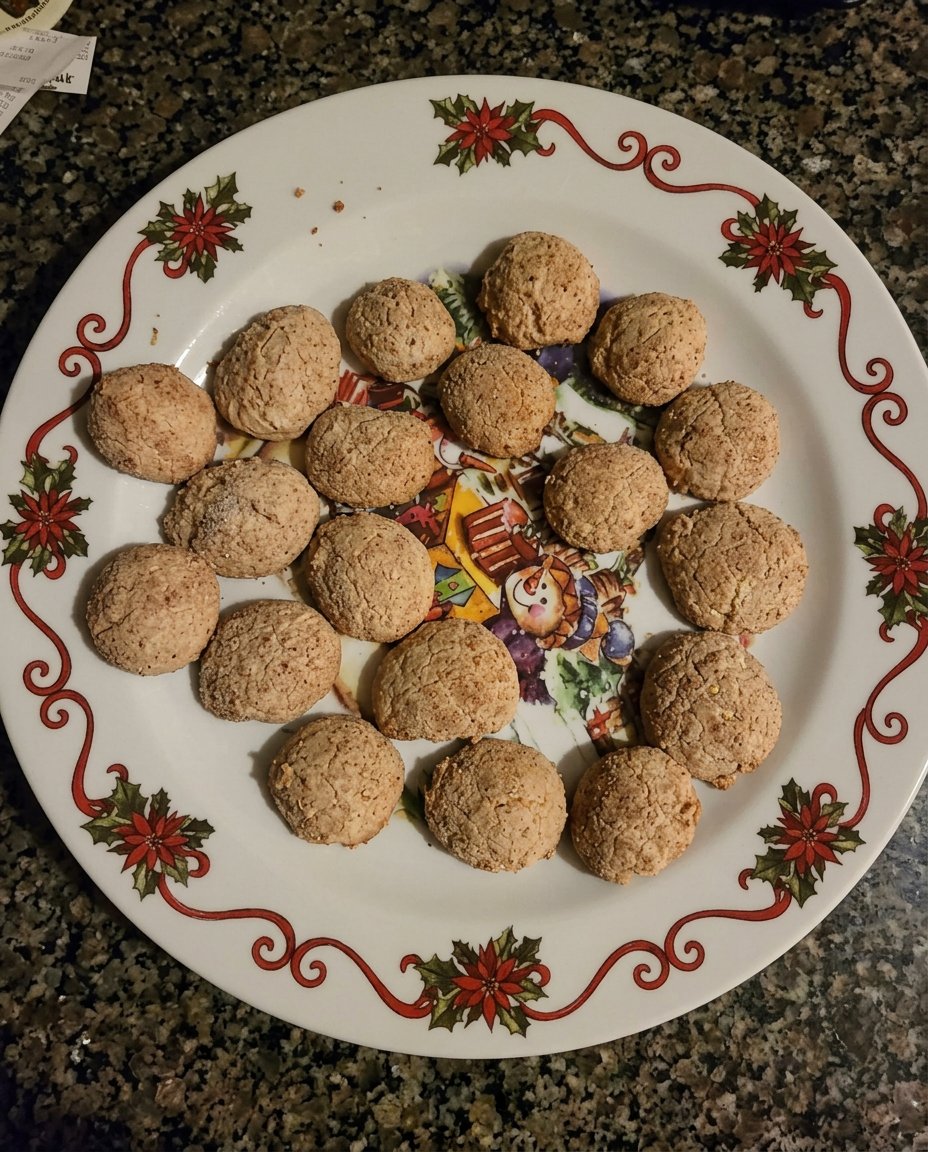
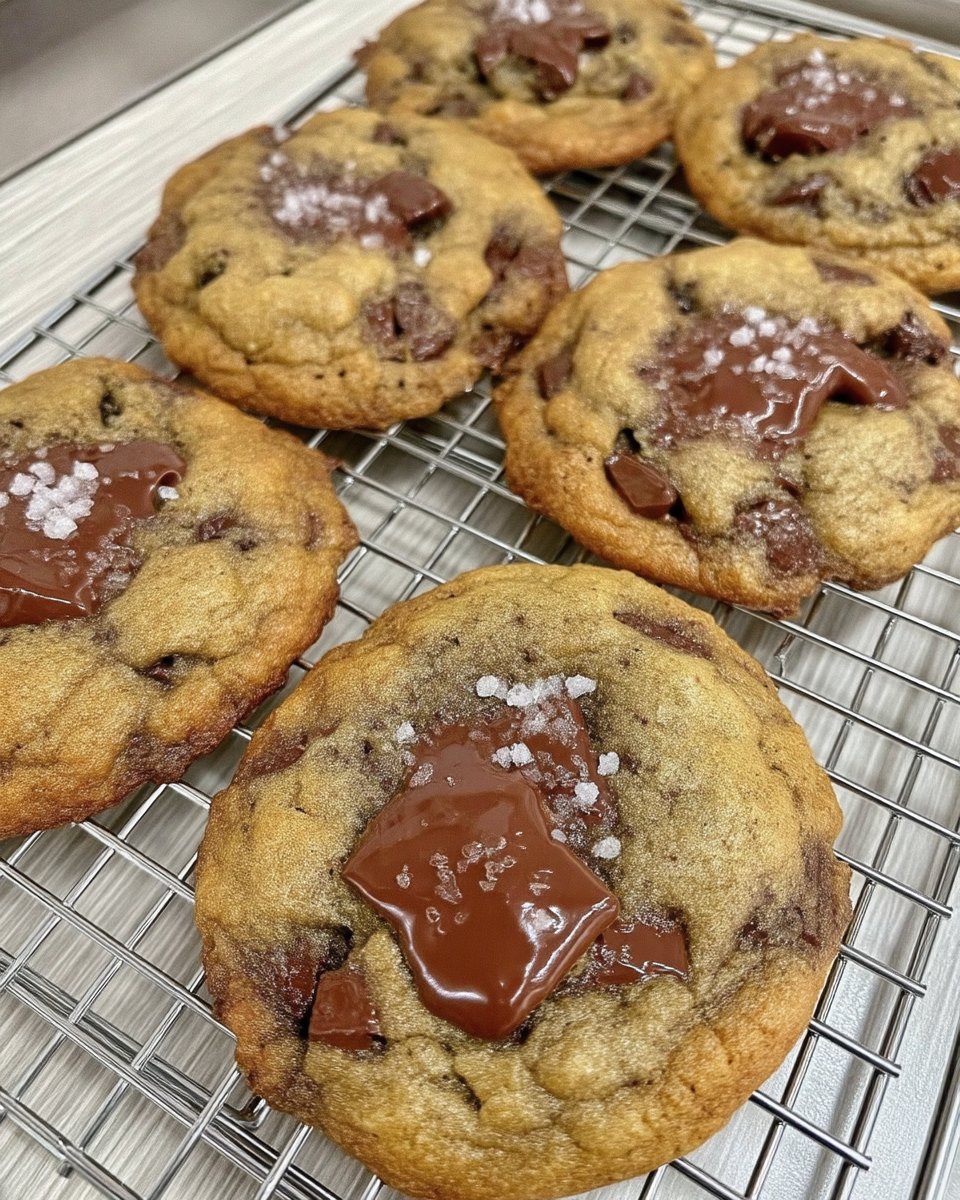
Texture lovers will absolutely adore the contrast in these cookies once they come out of the oven. The edges crisp up beautifully while the centers remain incredibly plush, soft, and slightly doughy in the best way possible. A quick roll in granulated sugar before baking creates a subtle, crackly crust that provides a delightful crunch against the tender interior. It is a multi-dimensional eating experience that feels much more complicated than it actually is.
You will also appreciate how forgiving and approachable this dough is, especially if you are baking with children or beginners. Because it requires no special equipment—just a couple of bowls and a trusty whisk—cleanup is a total breeze. There are no heavy mixer attachments to wash and no complex techniques to master. This leaves you with more time to simply enjoy the process of making memories in the kitchen with your family.
Finally, the make-ahead nature of this dough makes it a lifesaver for busy households and holiday preparations. You can mix up the simple dough on a quiet Sunday afternoon, let it rest in the fridge, and bake off fresh cookies on a chaotic Wednesday evening. This practical flexibility is exactly what modern home bakers need to keep traditions alive without feeling overwhelmed. It truly represents Grandma’s flavor adapted for a modern, bustling life.
Print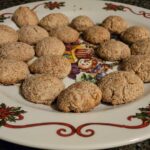
Brown Sugar Cookies
- Total Time: 3 hours 30 mins
- Yield: 24 cookies
- Diet: Vegetarian
Description
These thick and chewy brown sugar cookies are a time-saving version of a classic family favorite, featuring a rich molasses flavor and a signature crackly sugar crust. By using melted butter and a simple whisking method, you can achieve bakery-quality results with minimal active effort.
Ingredients
- 292 grams all-purpose flour, spooned and leveled
- 2 teaspoons cornstarch
- 1 teaspoon baking soda
- 1/2 teaspoon ground cinnamon
- 1/4 teaspoon salt
- 1 cup unsalted butter, melted and slightly cooled
- 1 1/4 cups brown sugar, packed
- 1 large egg, room temperature
- 2 teaspoons pure vanilla extract
- 1/3 cup granulated sugar, for rolling
Instructions
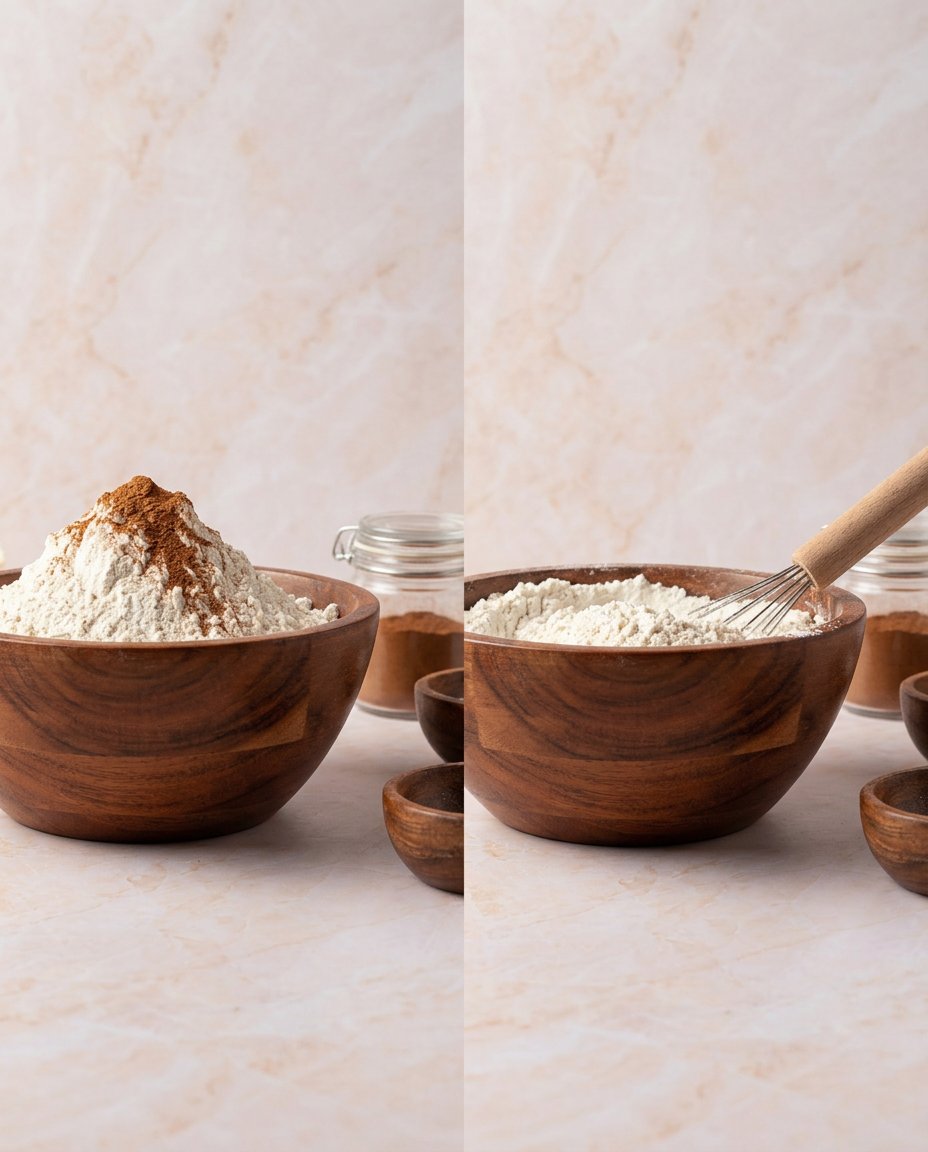
- In a large mixing bowl, whisk together the all-purpose flour, baking soda, cornstarch, ground cinnamon, and salt until the leavening agents are evenly distributed.
- In a separate medium bowl, whisk the melted and slightly cooled butter with the packed brown sugar until the mixture is smooth and lump-free.
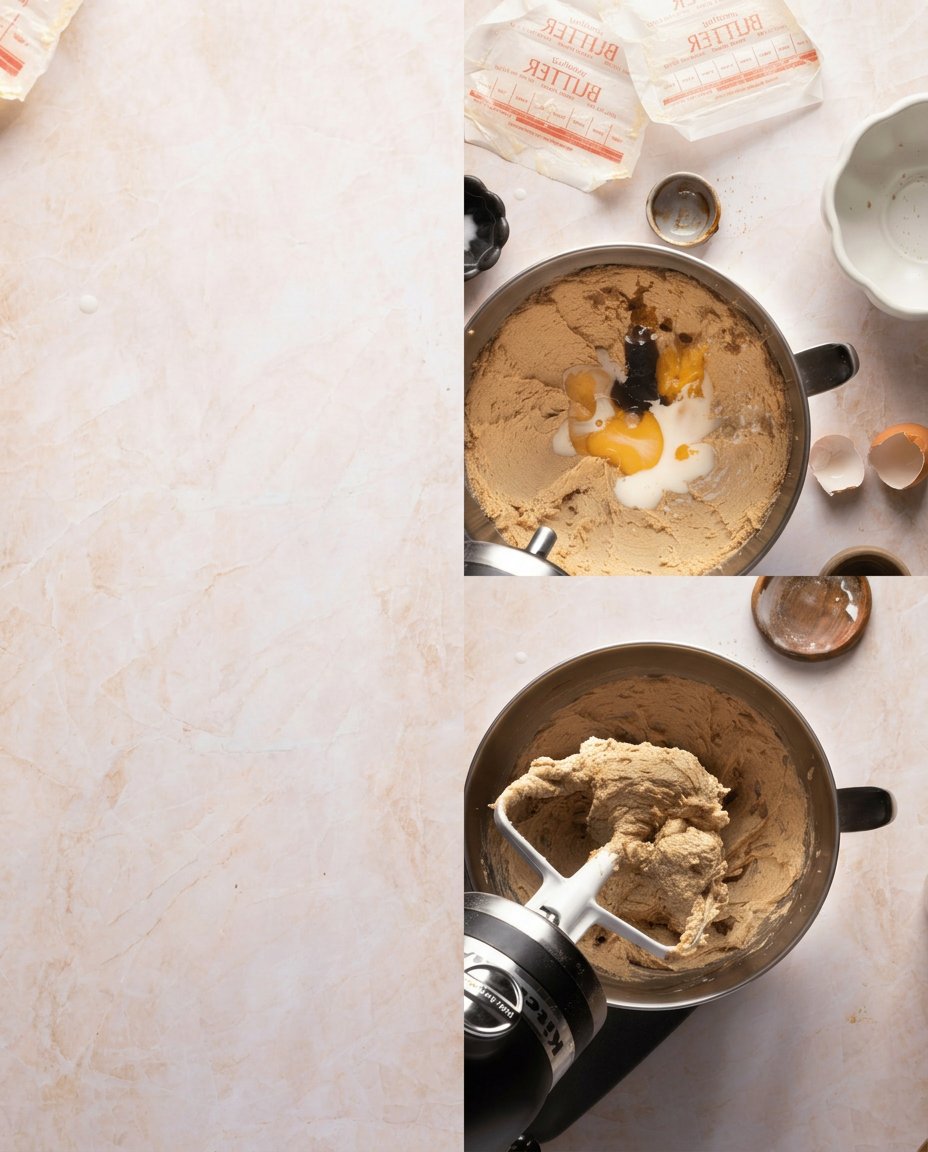
- Add the room-temperature egg and vanilla extract to the butter mixture, whisking until the liquid is glossy and cohesive.
- Fold the wet ingredients into the dry ingredients using a spatula just until no streaks of flour remain, being careful not to overmix the thick dough.
- Cover the bowl tightly and refrigerate for at least 3 to 4 hours to allow the flour to hydrate and the butter to firm up.
- Preheat your oven to 325°F (163°C) and line two baking sheets with parchment paper.
- Scoop 1.5 tablespoons of dough, roll into balls, and coat them thoroughly in the granulated sugar.
- Place the dough balls 3 inches apart on the baking sheets and bake for 14 to 16 minutes until the edges are set but the centers remain soft.
- Let the cookies cool on the baking sheet for 10 minutes to set before transferring them to a wire rack.
Notes
To ensure your cookies have the perfect plush texture, double-check that your baking soda is fresh and your flour is measured by weight if possible. If the dough has been chilling for more than a few hours, let it sit on the counter for 15 minutes before scooping to make it more manageable. These cookies stay incredibly soft for several days when stored in an airtight container at room temperature.
- Prep Time: 15 mins
- Cook Time: 15 mins
- Category: Dessert
- Method: Baking
- Cuisine: American
Simple Pantry: What You’ll Need
Creating these incredibly cozy cookies requires nothing more than basic pantry staples, meaning you can likely bake a batch right now without a trip to the store. Every ingredient plays a specific role in achieving that soft, thick, and chewy texture we all love. Here is exactly what you need to gather before you start mixing.
- All-Purpose Flour: This forms the crucial structure of the cookie. It is highly recommended to spoon your flour into the measuring cup and level it off with a knife, or use a kitchen scale to measure exactly 292 grams. Scooping directly with the cup packs the flour down, which can lead to dry, crumbly cookies.
- Cornstarch: This is a fantastic modern trick for baking incredibly soft cookies. Adding just a little bit of cornstarch helps tenderize the dough, giving the cookies a plush, melt-in-your-mouth quality. If you happen to be out, you can leave it out, but it really makes a positive difference in the final texture.
- Baking Soda: The essential leavening agent that helps the cookies spread perfectly and brown nicely in the oven. Make sure your baking soda is fresh for the best lift.
- Ground Cinnamon: A gentle dash of cinnamon adds a beautiful warmth that complements the molasses notes in the brown sugar. The recipe calls for a half teaspoon, but if you want a bolder, spicier profile, go ahead and double it.
- Salt: Just a quarter teaspoon balances all the sweetness and brings out the rich buttery flavors. Do not skip the salt, as it makes the other ingredients shine.
- Unsalted Butter: Using melted butter is the time-saving hero of this recipe. It creates a chewier cookie than creamed butter and saves you from waiting for ingredients to soften. Just let it cool slightly before mixing so you do not accidentally cook the egg.
- Brown Sugar: The star of the show. You need a full one and a quarter cups, packed tightly. Using a mix of half light and half dark brown sugar provides a wonderful depth of flavor, but you can use whatever you have in the pantry.
- Large Egg: A single room-temperature egg binds the dough together and adds moisture. Room temperature is important because it mixes smoothly into the butter and sugar without causing the melted butter to seize up.
- Pure Vanilla Extract: Two full teaspoons add that classic, nostalgic bakery aroma. A good quality vanilla always makes a simple drop cookie taste spectacular.
- Granulated Sugar: You will need a third of a cup set aside in a small bowl. Rolling the portioned dough balls in granulated sugar right before baking creates a beautiful, sparkly, crackly exterior.
Quick Method: How to Make It
Step 1: Prep Your Dry Ingredients
Start by grabbing a large mixing bowl to combine your foundational dry ingredients. Vigorously whisk together the spooned-and-leveled all-purpose flour, baking soda, cornstarch, ground cinnamon, and salt. Whisking not only distributes the leavening agents evenly but also lightly aerates the flour, acting as a quick alternative to sifting. Set this bowl aside so it is ready when you need it.
Step 2: Whisk the Wet Ingredients
In a separate medium-sized bowl, pour in your slightly cooled melted butter and the packed brown sugar. Use a whisk to vigorously blend them together until the mixture is smooth and no stubborn lumps of brown sugar remain. Once the sugar and butter are happily married, whisk in the room-temperature egg and the vanilla extract. Keep mixing until the liquid becomes glossy and completely cohesive.
Step 3: Combine the Cookie Dough
Now it is time to bring everything together. Pour your wet butter mixture directly into the bowl with the dry ingredients. Switch from your whisk to a sturdy silicone spatula or a classic wooden spoon. Gently fold and mix the ingredients just until you no longer see any streaks of dry flour. The resulting dough will be remarkably soft and quite thick, which is exactly how it should look at this stage.
Step 4: The Mandatory Chill
Because we used melted butter to save active prep time, the dough must now rest and firm up. Cover the bowl tightly with plastic wrap or a reusable lid and place it in the refrigerator. You need to chill the dough for at least 3 to 4 hours, though you can leave it for up to 3 days if you are prepping ahead. This resting period allows the flour to fully hydrate and the butter to solidify, preventing the cookies from melting into flat puddles in the oven.
Step 5: Scoop and Roll
When you are ready to bake, preheat your oven to 325°F (163°C) and line two large baking sheets with parchment paper. If your dough has been chilling for longer than 4 hours, let it sit on the counter for about 15 minutes to soften just enough to scoop. Pour your granulated sugar into a small, shallow bowl. Scoop about 1.5 tablespoons of dough per cookie, roll it into a neat ball between your palms, and toss it in the sugar until completely coated. Place them on the prepared sheets, leaving about 3 inches of space between each dough ball.
Step 6: Bake and Cool
Bake the cookies for 14 to 16 minutes. You will know they are ready when the edges look set and tiny cracks begin to form on the surface. They will still look quite puffy and very soft in the center, which is perfect. Take them out of the oven and let them cool directly on the hot baking sheet for 10 full minutes; they will deflate slightly and finish setting up. Finally, transfer them to a wire rack to cool completely before storing.
Meagan’s Tips: Quick Wins
Getting bakery-quality results at home is all about knowing a few smart, time-saving tricks. First, always make sure to let your melted butter cool for about 5 to 10 minutes before you start whisking in the brown sugar and egg. If the butter is boiling hot, it can actually scramble the egg and melt the sugar into a greasy mess. A little patience here guarantees a perfectly smooth, glossy wet mixture that binds the dough beautifully.
When it comes to measuring flour for this specific recipe, accuracy is your best friend. The number one reason drop cookies spread too much or turn out dry is an incorrect flour ratio. If you have a digital kitchen scale, grab it and measure out exactly 292 grams. If you are using cups, use a spoon to fluff the flour, lightly scoop it into your measuring cup, and level it off with the flat edge of a butter knife. This simple habit changes the game for your baking success.
Do not skip the chilling time, as tempting as it might be when you want a warm cookie immediately. Melted butter makes the dough incredibly soft, and placing it straight into a hot oven will cause the cookies to spread completely flat. For an interesting deep-dive into the science of cookie texture, I love referencing this chewy brown sugar cookies method which explains why chilling is so vital. Use that resting time to clean up your kitchen, read a book, or run an errand.
If you want perfectly round cookies, keep a large round biscuit cutter or a wide mug handy. The moment the baking sheet comes out of the oven, while the cookies are still piping hot and soft, place the cutter over a cookie and gently swirl it around in a circular motion for a few seconds. This nudges the edges inward and creates a flawlessly round shape. For more foolproof techniques like this, take a look at our favorite Quick & Easy Cookies guide.
Classic Options: Easy Changes
One of the best things about a reliable drop cookie is how easily you can customize it to suit your mood or what you have in the pantry. If you want to lean heavily into a fall flavor profile, try adding a half teaspoon of ground ginger, a pinch of nutmeg, and a dash of allspice to the dry ingredients. This turns a standard brown sugar treat into a deeply spiced, warming cookie that pairs wonderfully with a cup of hot apple cider or a morning coffee.
For a slightly more decadent twist, you can introduce a browned butter element. Browning the butter adds a nutty, toasted flavor that takes the classic molasses notes to a whole new level. Just remember that browning evaporates some of the water in the butter, so you will need to add 2 tablespoons of milk or water to your wet ingredients to make up for the lost moisture. If you love discovering heritage flavor twists, browse our collection of Classic Cookie Recipes for more ideas.
Adding mix-ins is another quick way to change things up without altering the core recipe. A half cup of finely chopped, toasted pecans or walnuts folded into the dough right before chilling adds a delightful crunch and a savory contrast to the sweet dough. Alternatively, a handful of butterscotch chips or dark chocolate chunks can transform this simple base into a rich, indulgent bakery-style treat. Keep the additions minimal so the delicate brown sugar flavor still shines through.
Modern Sharing: How to Serve
These cookies are wonderfully versatile and fit right into a busy modern lifestyle, whether you are packing lunchboxes or hosting a casual weekend gathering. They are sturdy enough to stack in a container for a school snack, yet beautiful enough to serve on a nice platter with afternoon tea. The sparkling sugar crust makes them look instantly finished and intentional, saving you the extra step of mixing up a frosting or a glaze.
For a truly spectacular dessert, try turning these into homemade ice cream sandwiches. Let the cookies cool completely so they are firm enough to handle. Scoop a generous portion of vanilla bean or butter pecan ice cream onto the flat side of one cookie, top it with a second cookie, and gently press them together. Wrap the sandwiches in parchment paper and pop them in the freezer to set up for a fantastic, nostalgic treat.
They also make brilliant gifts for teachers, neighbors, or anyone who could use a little extra comfort. Because they stay soft and chewy for several days when stored in an airtight container at room temperature, they travel exceptionally well. If you are looking for more treats that are perfect for giving and sharing, take a peek at our lovely Wholesome Cookie Options archive. A simple tied ribbon around a bakery box filled with these brown sugar delights is guaranteed to bring a smile to anyone’s face.
Heritage Rediscovered: Keep Baking
Finding that perfect intersection between nostalgic flavor and modern convenience is what makes home baking so incredibly rewarding. These Brown Sugar Cookies prove that you do not need to spend your entire day tied to the kitchen to produce a treat that tastes like it came straight from Grandma’s recipe box. With just a whisk, a bowl, and a little patience while the fridge does the heavy lifting, you can pull warm, chewy, molasses-scented magic from your oven anytime the craving strikes.
We love seeing how you adapt these quick classics in your own homes. Whether you bake them exactly as written for a quiet weeknight dessert or add a pinch of extra cinnamon for a festive twist, we want to celebrate your baking victories. For more inspiration on how to fill your cookie jars with joy, explore our Holiday Cookie Celebrations category and discover new family favorites.
Please share your beautiful cookie stacks and kitchen moments with us online! Tag us on Instagram, pin this recipe for your next baking day on Pinterest, or join our friendly community discussions over on Facebook. Happy baking, and enjoy every single chewy, sugary bite!
